The Official Scent of Cozy
There are certain smells that act as a time machine. For me, the scent of cinnamon and apples caramelizing in a hot oven transports me straight back to my grandmother’s kitchen on a blustery autumn afternoon. It’s the smell of warmth, of safety, of knowing that something wonderful is about to land on the table, still bubbling at the edges and demanding a scoop of melting vanilla ice cream. This isn’t just a dessert; it’s an edible hug.
Forget complicated pastries or fussy, layered tortes. Sometimes, the soul craves simplicity. It craves that perfect contrast: the yielding, jammy softness of cooked apples against a shatteringly crisp, buttery oat blanket. That’s the magic we’re chasing today with this ridiculously easy baked apple crumble. It’s the ultimate crowd-pleaser, the hero of potlucks, and the perfect excuse to “test” a spoonful straight from the baking dish.
Recommended Product
 -11%
-11%
8‑Piece Deep Glass Baking Dish Set with Plastic Lids (Rectangular Bakeware)
- Material: Oven, freezer & microwave safe borosilicate glass (goes from fridge/oven without cracking)
- Pieces →: 4 rectangular dishes + 4 tight‑fitting plastic lids (stackable)
- Easy Care →: Dishwasher safe glass & lids

Why This Easy Baked Apple Crumble with Oat Topping is Your New Best Friend
Let’s be real. Life is too short for overly complicated recipes that require a dozen special tools and the patience of a saint. The beauty of this particular Easy Baked Apple Crumble with Oat Topping lies in its elegant simplicity. There are no fancy techniques here, no obscure ingredients to hunt down. It’s a recipe built on pantry staples, a testament to the idea that the best food is often the most straightforward.
🍳 Used in this recipe
Get It on Amazon Basics✔ Free Delivery | ✔ Top Rated | ✔ Budget-FriendlyThe process is therapeutic. You get to peel and slice apples, feeling the cool, smooth skin give way to the crisp flesh. You get to rub butter and oats and sugar together with your fingertips, creating a crumbly texture that feels like playing with edible sand. It’s a hands-on, soul-satisfying process from start to finish. And the reward? A dessert that looks and tastes like you spent hours fussing over it, when in reality, you just threw some things in a bowl and let the oven do all the hard work. This is the kind of recipe that makes you look like a rock star in the kitchen with minimal effort.
The Apple: The Unsung Hero of Our Story
Before we even think about the topping, we need to talk about the star of the show: the apple. Not all apples are created equal, and choosing the right one can be the difference between a firm, flavorful filling and a mushy, watery disappointment. This is where the magic begins.
The secret is to use a firm, tart apple that can stand up to the heat. Think of it like casting the lead role in a blockbuster movie—you need someone with presence and character. For this Easy Baked Apple Crumble with Oat Topping, the undisputed champions are Granny Smiths. Their bright, tart flavor cuts through the sweetness of the crumble topping, creating a perfectly balanced bite. They also hold their shape beautifully during baking, so you get tender slices of apple, not apple sauce. For a slightly sweeter, more complex flavor profile, you can mix in a few Honeycrisp or Braeburn apples. But whatever you do, avoid Red Delicious. They turn to mush. We’re aiming for tender, not tragic.
🍳 Used in this recipe
Get It on Amazon Basics✔ Free Delivery | ✔ Top Rated | ✔ Budget-FriendlyTales from the Crumble Trenches: Common Mistakes to Sidestep
Even the easiest recipes have their pitfalls. But don’t worry, I’ve made all the mistakes so you don’t have to. Here are the top ways this delightful dessert can go sideways and how to ensure you get perfection on the first try.
1. The Waterlogged Filling
Nothing is sadder than a soupy crumble. This usually happens for two reasons: you chose the wrong apple (see above!), or you didn’t give your filling enough thickener. A good pinch of all-purpose flour or cornstarch mixed in with the sugar and spices is non-negotiable. It soaks up the juices released by the apples as they bake, transforming them into a luscious, thick syrup instead of a watery puddle at the bottom of your dish.
2. The Cardboard Topping
Your crumble topping should be a thing of beauty—chunky, uneven, and full of promise. If it comes out of the oven as a single, uniform, hard-as-a-rock sheet, you’ve overworked it. When you’re mixing the butter into the dry ingredients, stop as soon as you have a crumbly mixture with pea-sized clumps. Think of it like making biscuits; the less you handle it, the more tender and delightful the final texture will be.
🍳 Used in this recipe
Get It on Amazon Basics✔ Free Delivery | ✔ Top Rated | ✔ Budget-Friendly3. The Uneven Bake
We’ve all been there: the edges are burnt to a crisp and the middle is still cold. This is usually a sign of an oven that’s running too hot, or a baking dish that’s too small. Give your crumble some breathing room! Use a dish that’s large enough to spread the apples in a relatively thin, even layer. And always place your baking dish on the center rack of the oven to ensure even heat circulation.
The Flavor Makers: What You Need to Raid the Pantry
This is where we build our masterpiece. Simple ingredients, but each one plays a crucial role. Don’t skip the oats—they’re the secret to that incredible, crunchy texture!
* **The Apples:** 5-6 medium Granny Smith apples. Peel, core, and slice them into ½-inch thick pieces.
* **The Sweet & Tangy:** ½ cup of granulated sugar and a squeeze of fresh lemon juice. The lemon keeps the apples from browning and adds a bright pop of flavor.
* **The Spice Cabinet:** 1 teaspoon of ground cinnamon and a pinch of nutmeg. This is the warm, cozy soul of the dish.
* **The Filling Binder:** 2 tablespoons of all-purpose flour. This is your insurance policy against a soupy filling.
* **The Crumble Base:** 1 cup of all-purpose flour, 1 cup of old-fashioned rolled oats (not instant!), and ½ cup of packed brown sugar. The brown sugar gives the topping a deeper, molasses-like flavor.
* **The Magic:** ½ cup of cold, unsalted butter, cut into small cubes. Cold is key! It creates steam pockets as it melts in the oven, leading to a flakier, crispier crumble.
🍳 Used in this recipe
Get It on Amazon Basics✔ Free Delivery | ✔ Top Rated | ✔ Budget-FriendlyLet’s Get Cooking: The Step-by-Step
Ready to make your kitchen smell like a dream? This process is so simple, you could almost do it with your eyes closed (though I wouldn’t recommend it).
1. **Prep Your Stage:** First, get your oven preheating to 375°F (190°C). Then, grab a 9×13 inch baking dish or a similar-sized casserole dish and give it a light greasing with a pat of butter.
2. **Build the Apple Base:** In a large bowl, toss your sliced apples with the granulated sugar, lemon juice, cinnamon, nutmeg, and the 2 tablespoons of flour. Make sure every single slice is coated in that glorious mixture. Pour this apple mixture into your prepared baking dish and spread it out into an even layer.
3. **Create the Crumble:** In a separate bowl, combine the 1 cup of flour, the rolled oats, and the brown sugar. Give it a quick stir to combine. Now, add the cold, cubed butter.
4. **The Magic Touch:** This is the best part. Using just your fingertips, rub the cold butter into the dry ingredients. Keep going until the mixture looks like coarse breadcrumbs with some larger, pea-sized clumps remaining. Don’t overthink it—just get in there and have fun!
5. **Top It Off:** Sprinkle the crumble topping evenly over the apples in the baking dish. Don’t press it down; leave it light and craggy for the best texture.
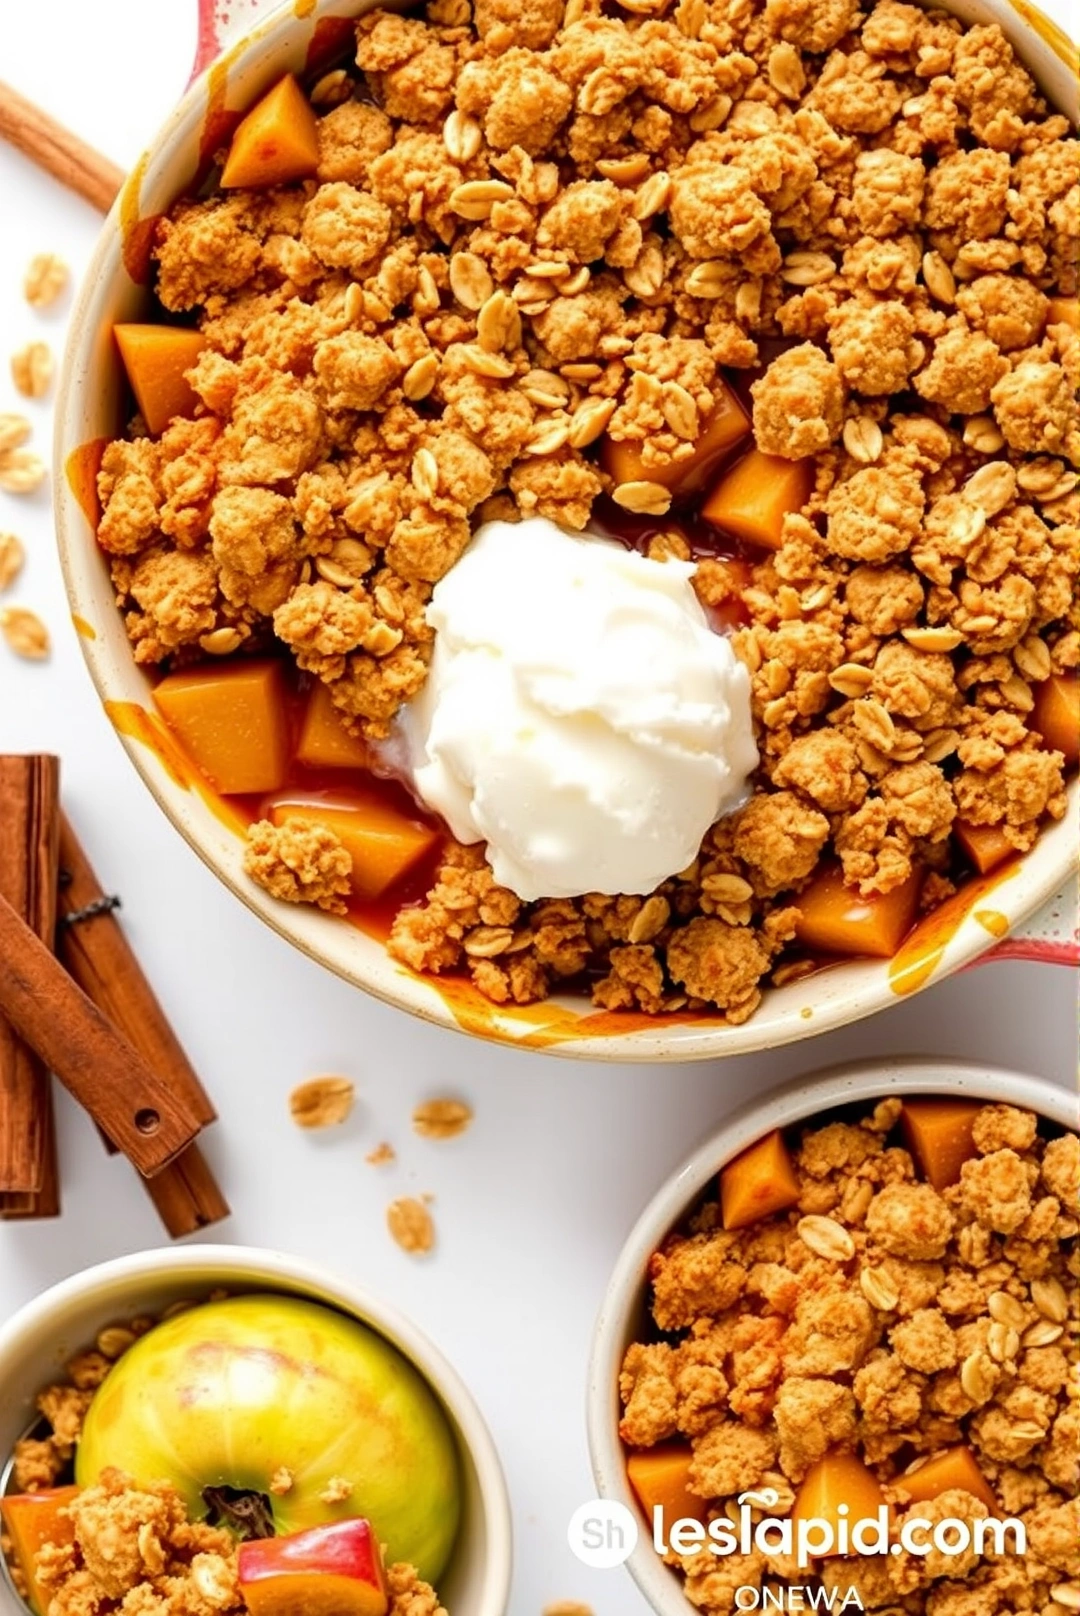
6. **Bake to Golden Perfection:** Place the dish on the center rack of your preheated oven and bake for 40-45 minutes. You’re looking for a topping that’s deeply golden brown and crisp, and for the apple filling to be bubbling energetically around the edges. The smell will be absolutely intoxicating.
7. **The Hardest Part: Waiting:** Once you pull it from the oven, resist the urge to dive in immediately. Let your Easy Baked Apple Crumble with Oat Topping rest for at least 15-20 minutes. This allows the filling to set up slightly, so it’s thick and luscious instead of runny.
Vibes for Serving: Setting the Scene
This dessert is more than just food; it’s an event. It’s the culinary equivalent of putting on a cozy sweater and curling up with a good book while rain patters against the window. It’s the grand finale to a hearty family dinner, the centerpiece of a casual get-together with friends, or the ultimate “I deserve this” treat after a long week.
🍳 Used in this recipe
Get It on Amazon Basics✔ Free Delivery | ✔ Top Rated | ✔ Budget-FriendlyRecommended Product
 -15%
-15%
Silicone Baking Mat with Measurement Guide (Non-Stick Pastry & Cake Mat)
- Material →: Food-grade silicone (safe for baking)
- Surface →: Non-stick (no butter or oil needed)
- Design →: Measurement guide for perfect cake sizes
Serve it warm, straight from the oven. The contrast between the hot, soft apples and a scoop of cold, creamy vanilla bean ice cream is a non-negotiable life experience. As the ice cream melts and mingles with the cinnamon-spiced juices, you’ll understand what I mean. For an extra touch of decadence, a drizzle of thick caramel sauce or a dollop of freshly whipped cream never hurts. Pair it with hot apple cider or strong, black coffee to cut through the sweetness.
The Leftover Lowdown: Your Storage Survival Guide
First of all, the idea of having leftovers is cute, but it might not happen. If you do somehow manage to show restraint, here’s how to keep that magic alive.
Storing in the Fridge
Cover the baking dish tightly with foil or plastic wrap, or transfer individual portions to airtight containers. Your crumble will keep well in the refrigerator for up to 4 days. The topping will soften a bit, but it’s still fantastic.
🍳 Used in this recipe
Get It on Amazon Basics✔ Free Delivery | ✔ Top Rated | ✔ Budget-FriendlyReheating for Maximum Crispiness
The microwave is quick, but it will turn your topping soggy. For the best results, reheat individual portions in an oven or toaster oven at 350°F (175°C) for 10-15 minutes, or until warmed through and the topping has crisped up again. It’s worth the extra few minutes!
How to Freeze Easy Baked Apple Crumble with Oat Topping
This recipe freezes beautifully! You can freeze it either before or after baking. To freeze before baking, assemble the crumble in a freezer-safe dish, cover tightly with a layer of plastic wrap and a layer of foil, and freeze for up to 3 months. When you’re ready to bake, you can either thaw it in the fridge overnight or bake directly from frozen (just add an extra 15-20 minutes to the baking time). To freeze after baking, let it cool completely, then cover and freeze. Reheat from frozen in a 375°F oven until bubbling.
Crumbly Questions & Answers (FAQ)
Is this Easy Baked Apple Crumble with Oat Topping recipe considered healthy?
That depends on your definition of healthy! It’s made primarily from fruit and whole grains (thanks to the oats!). It’s a fantastic homemade dessert that allows you to control the amount of sugar. It’s certainly a more wholesome choice than many store-bought desserts loaded with preservatives and artificial flavors. Enjoy it as part of a balanced diet!
🍳 Used in this recipe
Get It on Amazon Basics✔ Free Delivery | ✔ Top Rated | ✔ Budget-FriendlyWhat are the calories in Easy Baked Apple Crumble with Oat Topping?
The calorie count will vary based on your specific ingredients and portion size. A general estimate for a serving (about 1/8th of a 9×13 pan) is around 300-400 calories, especially if you’re generous with the butter and sugar in the topping. Adding a scoop of ice cream or whipped cream will, of course, increase that number!
Can I use a different fruit instead of apples?
Absolutely! This recipe is a fantastic template. In the summer, try it with a mix of berries, peaches, or plums. In the winter, pears work beautifully. Just be mindful of the fruit’s juiciness; berries might release more liquid, so you may want to add an extra tablespoon of flour to the filling.
My topping isn’t browning. What’s wrong?
Your oven might not be hot enough, or you might need to move the dish to a higher rack for the last 5-10 minutes of baking. You can also try using a mix of brown and white sugar in the topping, as brown sugar caramelizes more readily. Make sure your butter is real butter, as margarine often doesn’t brown in the same delicious way.
🍳 Used in this recipe
Get It on Amazon Basics✔ Free Delivery | ✔ Top Rated | ✔ Budget-FriendlyRecommended Product
 -33%
-33%
Astercook 15‑Piece Kitchen Knife Set with Built‑In Sharpener Block
- Built‑In Sharpener →: Integrated sharpener in block for easy maintenance
- Material →: High‑carbon German stainless steel blades (rust‑resistant, durable)
- Dishwasher Safe →: Yes (but hand washing recommended to preserve sharpness)
Can I make this Easy Baked Apple Crumble with Oat Topping ahead of time?
Yes! You can assemble the entire dish, cover it, and refrigerate it for up to 24 hours before you plan to bake it. You might need to add 5-10 minutes to the baking time if you’re putting a cold dish directly into a hot oven. For more inspiration and ideas, you can always check out our main recipe page for the Easy Baked Apple Crumble with Oat Topping. And if you’re looking for beautiful visual inspiration, there are some gorgeous pins over on Pinterest that will get you running for the kitchen.

Easy Baked Apple Crumble with Oat Topping
Ingredients
Ingredients
- 6 cups apples peeled, cored, and sliced (about 2-3 medium apples like Honeycrisp or Granny Smith)
- 2 tbsp all-purpose flour for the filling
- 1/4 cup granulated sugar divided
- 1 tsp ground cinnamon divided
- 1/2 cup old-fashioned rolled oats not instant
- 1/2 cup all-purpose flour for the topping
- 1/3 cup light brown sugar packed
- 1/4 tsp salt
- 6 tbsp unsalted butter cold, cut into small cubes
- 1 tsp vanilla extract optional, for the filling