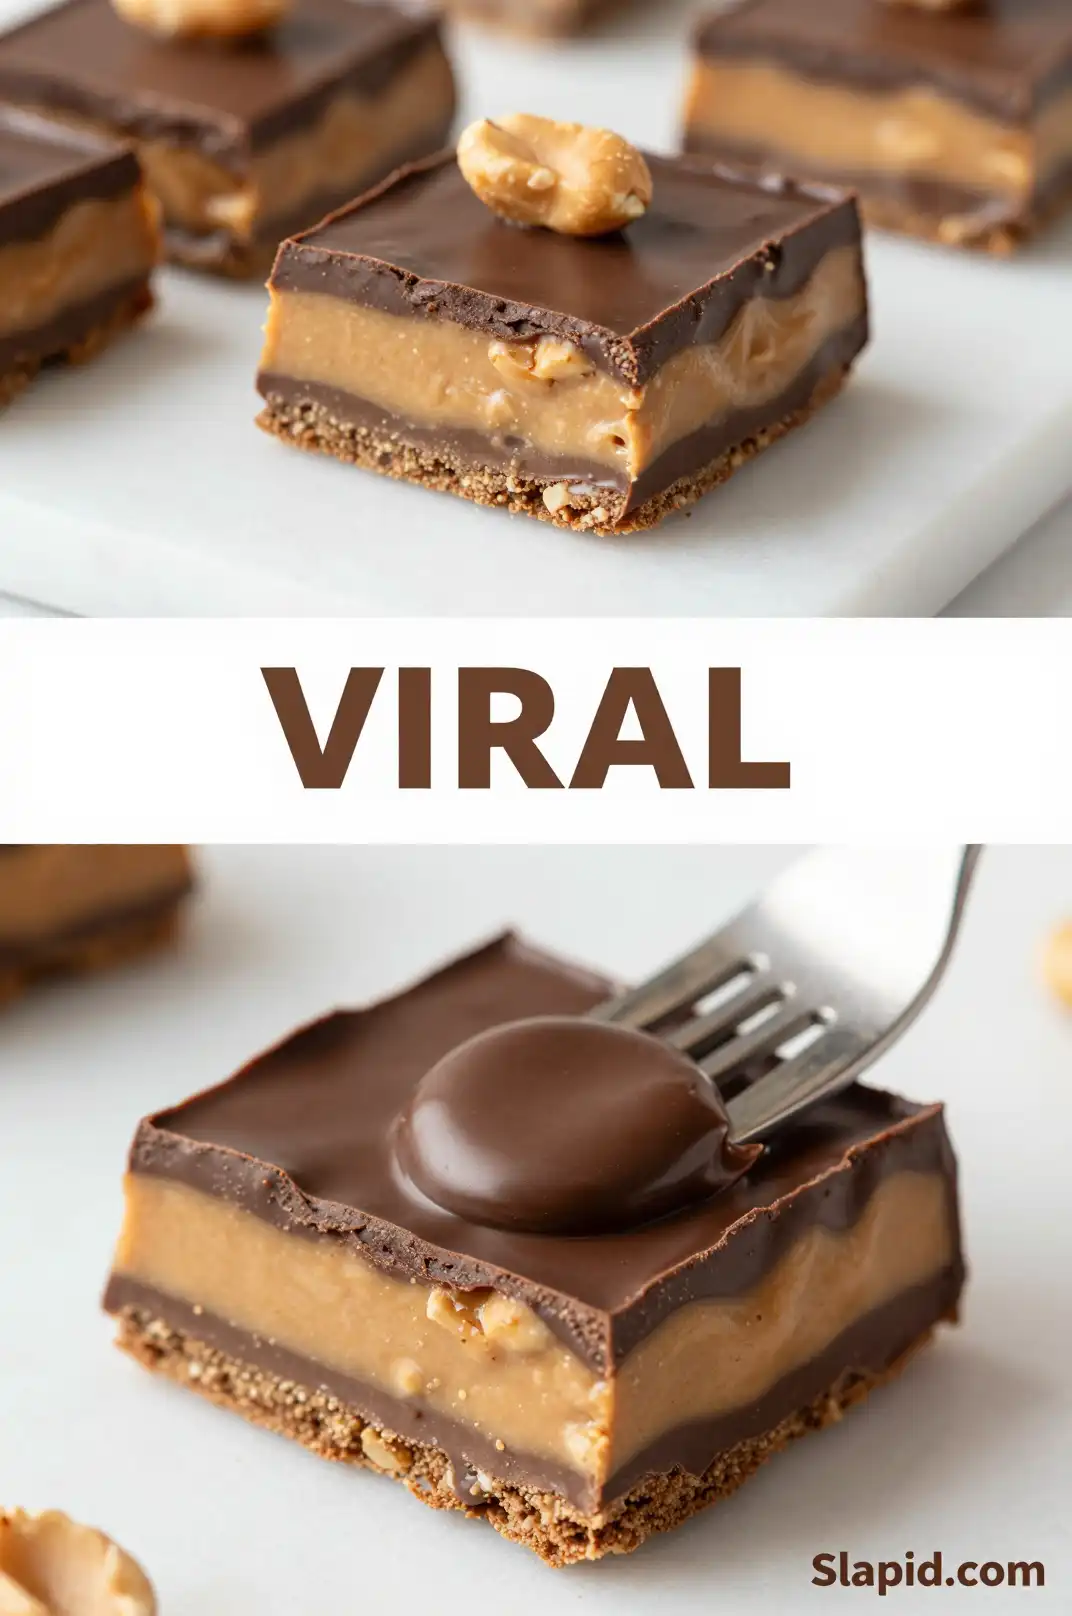
The Sweet, Silent Siren Call of the Pantry
It’s 3 PM. The sun is beating down, and the very idea of turning on the oven feels like a personal betrayal. My stomach rumbles for something sweet, something that cracks under a fork with a satisfying snap and melts into a creamy, salty-sweet puddle. This is the moment these bars were born for. No baking, no fuss, just pure, unadulterated chocolate and peanut butter magic. The smell alone—rich cocoa and roasted nuts—is enough to make you forget all about that oven.
Why These Bars Are Your New Best Friend
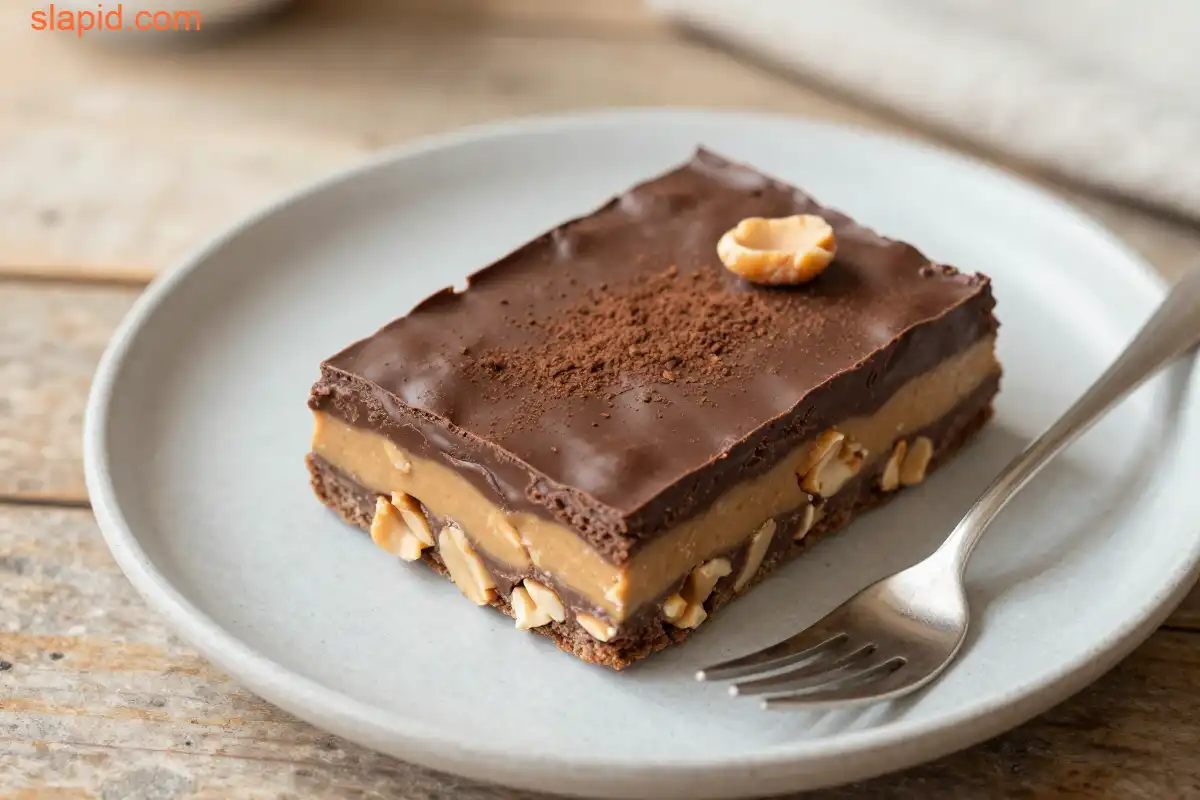
Let’s be real. We’re all busy. The idea of a “decadent dessert” usually comes with a side of stress and a sink full of dishes. These bars laugh in the face of that. They are the culinary equivalent of a deep, satisfied sigh. The magic is in the layers: a buttery, crisp crumb crust that gives way to a layer of impossibly creamy peanut butter filling, all crowned with a glossy, crackly chocolate shell. It’s a textural symphony that requires nothing more than a bowl, a spoon, and a little patience while they set. This is the kind of dessert you make for yourself on a Tuesday just because you can. It’s also the kind you make for a potluck and watch disappear in minutes. I’ve shared the recipe on my blog at [slapid.com](https://slapid.com/recipes/easy-no-bake-chocolate-peanut-butter-bars/) for easy access, but the real test is in the making.
Recommended Product
 -11%
-11%
8‑Piece Deep Glass Baking Dish Set with Plastic Lids (Rectangular Bakeware)
- Material: Oven, freezer & microwave safe borosilicate glass (goes from fridge/oven without cracking)
- Pieces →: 4 rectangular dishes + 4 tight‑fitting plastic lids (stackable)
- Easy Care →: Dishwasher safe glass & lids
The Secret Alchemy of the Crust
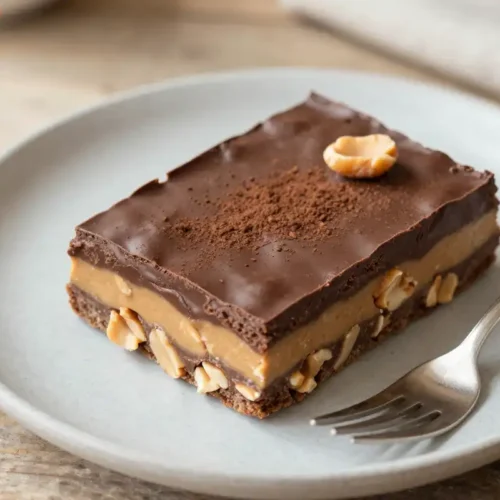
You might think the crust is just a vehicle for the good stuff, but think again. This isn’t a sad, soggy bottom. The secret lies in the marriage of **crushed digestive biscuits** (or graham crackers for my American friends) and melted butter. The butter doesn’t just bind; it toasts the crumbs as it cools, creating a deeply flavorful, sturdy base that holds its shape like a dream. It’s the unsung hero of this dessert, providing a crucial textural contrast to the creamy layers above. Think of it as the sturdy foundation of a very delicious, very necessary house. When you press it into the pan, you’re not just making a layer—you’re building anticipation.
🍳 Used in this recipe
Get It on Amazon Basics✔ Free Delivery | ✔ Top Rated | ✔ Budget-FriendlyLet’s Get Cooking: The Step-by-Step
This isn’t a lecture; it’s a guided adventure. Grab your ingredients and let’s make some magic.
What You Need to Raid From the Pantry
* **For the Foundation:** Digestive biscuits (crushed into fine, sandy crumbs), melted butter, and a pinch of salt.
* **For the Heart:** Creamy peanut butter (the natural, oil-separating kind works best for flavor, but conventional works for ease), powdered sugar, and a splash of vanilla extract.
* **For the Crown:** Dark chocolate, chopped finely, and a little coconut oil (this is our secret for that glossy, professional-looking finish that snaps perfectly).
The Assembly Line
First, we build the base. Combine your crushed biscuits with the melted butter and a pinch of salt. The mixture should feel like wet sand. Press this firmly and evenly into the bottom of a lined 8×8 inch pan. This is crucial—a firm press means a clean break later. Pop this into the fridge to set while you work on the filling. See? Already chilling out.
🍳 Used in this recipe
Get It on Amazon Basics✔ Free Delivery | ✔ Top Rated | ✔ Budget-FriendlyIn a bowl, beat the peanut butter, powdered sugar, and vanilla together until it’s smooth, thick, and spreadable. It should hold its shape. Spoon this over your chilled crust and smooth it into an even layer. The contrast between the pale, creamy peanut butter and the dark crust is already stunning. Back into the fridge it goes for a quick 15-minute nap.
Finally, the grand finale. Melt your chopped chocolate and coconut oil together gently (microwave in 30-second bursts or over a double boiler). Stir until silky and smooth. Pour this over the peanut butter layer, tilting the pan to get an even, glossy coat. The sound it makes as it settles—a faint, liquid whisper—is pure audio bliss. Now, the hardest part: patience. Let it set completely, ideally in the refrigerator for at least 2 hours, or until the chocolate is firm.
How NOT to Mess This Up (A Friendly Guide)
Even the simplest recipes have their pitfalls. Consider this your cheat sheet to perfection.
🍳 Used in this recipe
Get It on Amazon Basics✔ Free Delivery | ✔ Top Rated | ✔ Budget-Friendly* **The Greasy Fudge Fiasco:** If your peanut butter layer is too soft or your chocolate too thick, you’ve got a mess. The fix? **Chill your layers between steps.** This isn’t just for fun; it’s structural integrity. A cold base won’t get soggy when the filling hits it. A cold filling means the chocolate won’t melt into it. It’s the difference between clean, beautiful layers and a delicious, but messy, amalgamation.
* **The Chocolate Bloom of Doom:** Ever seen chalky, white streaks on your chocolate? That’s fat bloom, usually from temperature shock. To avoid it, **don’t pour hot chocolate over a freezing cold base.** Let the chocolate cool slightly (but still be pourable) and take the pan out of the fridge for a minute before topping. It’s a simple dance of temperature that keeps your bars looking like they came from a fancy shop.
* **The Crust That Crumbles:** If your base won’t stick together, you likely didn’t use enough butter or didn’t press it down firmly enough. Butter is the glue here. Be generous and press like you mean it. Use the bottom of a flat glass to get it perfectly even. A well-pressed crust is a happy crust.
Serving Vibes: Setting the Scene
These bars are mood chameleons. On a scorching summer afternoon, they are the ultimate cool-down treat, served straight from the fridge with a cold glass of milk. On a cozy, rainy evening, they’re the perfect companion to a steaming mug of coffee or tea, their richness a welcome hug. They’re the star of a casual game night, cut into neat squares for easy grabbing. They’re the “I survived the workweek” reward you keep in the freezer, ready for a moment’s notice. For a party, cut them into smaller, bite-sized rectangles—they’re deceptively rich, so a little goes a long way. They look stunning on a dark slate platter, dusted with a tiny pinch of flaky sea salt to make the flavors pop.
Leftovers? Here’s the Plan
If you somehow have leftovers (a rare event), storage is key. Keep them in an airtight container in the refrigerator for up to a week. The chocolate will stay firm and the layers distinct. For longer storage, these bars freeze beautifully. This is where you build your emergency dessert stash.
🍳 Used in this recipe
Get It on Amazon Basics✔ Free Delivery | ✔ Top Rated | ✔ Budget-FriendlyFAQ: Your Burning Questions, Answered
How to freeze Easy No-Bake Chocolate Peanut Butter Bars?
This is a freezer-friendly superstar. First, let the bars set completely in the fridge. Then, cut them into individual portions. Place the pieces on a baking sheet lined with parchment paper, making sure they aren’t touching, and freeze until solid (about 1-2 hours). This prevents them from sticking together later. Once frozen solid, transfer the pieces to a freezer-safe bag or airtight container, separating layers with parchment paper. They’ll keep for up to 3 months. To enjoy, thaw in the refrigerator for a few hours or at room temperature for about 30 minutes.
What are the calories in Easy No-Bake Chocolate Peanut Butter Bars?
This is a decadent treat, so it’s a bit of a calorie powerhouse! A rough estimate for one bar (cut into 9 squares) is around 300-350 calories, depending on the specific brands of peanut butter and chocolate you use. The exact count varies, but a little goes a long way in satisfying that sweet tooth. For a lighter option, you can look for lower-sugar peanut butter and dark chocolate with a higher cocoa percentage.
Can I use crunchy peanut butter instead of creamy?
Absolutely! If you love a bit of texture in your filling, crunchy peanut butter works beautifully. It will change the mouthfeel of the middle layer, adding little nuggets of peanutty crunch. Just make sure it’s well stirred before measuring.
🍳 Used in this recipe
Get It on Amazon Basics✔ Free Delivery | ✔ Top Rated | ✔ Budget-FriendlyMy chocolate layer isn’t setting. What went wrong?
This usually comes down to a couple of things. First, did you let it cool for at least 2 hours? It needs time. Second, the type of chocolate matters. Chocolate chips often contain stabilizers that can make them set up too hard or not smoothly. Chopped bar chocolate is ideal. Lastly, the coconut oil helps with the setting process—if you omitted it, that could be the culprit. Give it more time in the fridge, and it should firm up.
How do I cut them into clean, pretty squares?
The secret is a hot, clean knife. Run your sharp knife under hot water, wipe it dry, and make a cut. Wipe the blade clean between each cut. This will give you those gorgeous, professional-looking edges. For extra precision, you can use a ruler to mark your cuts before you start slicing.
Now go forth and create your own no-bake masterpiece. Your pantry awaits, and a world of creamy, chocolatey, peanut-buttery bliss is just a few simple steps away. Happy no-baking
🍳 Used in this recipe
Get It on Amazon Basics✔ Free Delivery | ✔ Top Rated | ✔ Budget-FriendlyRecommended Product
 -15%
-15%
Silicone Baking Mat with Measurement Guide (Non-Stick Pastry & Cake Mat)
- Material →: Food-grade silicone (safe for baking)
- Surface →: Non-stick (no butter or oil needed)
- Design →: Measurement guide for perfect cake sizes
Easy No-Bake Chocolate Peanut Butter Bars
Ingredients
Ingredients
- 1 cup creamy peanut butter room temperature for easier mixing
- 1/2 cup unsalted butter, melted
- 2 cups graham cracker crumbs
- 1 cup powdered sugar
- 1 cup semi-sweet chocolate chips
- 2 tbsp creamy peanut butter (for topping)
- 1/4 cup chopped salted peanuts (optional for garnish)
Recommended Product
 -40%
-40%
Astercook 21‑Piece Non‑Stick Cookware Set with Detachable/Removable Handles
- Pieces Included →: 21‑piece set with multiple pots, pans, and accessories
- Non‑Stick Coating →: Premium ceramic non‑stick free of harmful PFOA chemicals for healthier cooking
- Cleanup →: Easy to clean thanks to non‑stick surface and detachable handles
- Compatibility →: Works on induction, gas, electric, and ceramic stovetops; oven safe with handles removed