The Cast Iron Skillet That Changed My Pizza Game Forever
It was a Tuesday. Rain was hammering the windows, and the fridge was looking… sparse. I craved pizza—the kind with a crust that crackles when you bite it, a cheese pull that defies physics, and toppings that sing. But the idea of wrestling with a sticky dough, flouring every surface in my kitchen, and cranking the oven to a blistering 500°F felt like a culinary Everest. Then, I remembered my trusty cast iron skillet. The one that lives on the stovetop, seasoned to a glossy black. This isn’t just a pan; it’s a secret weapon. In under an hour, I had a restaurant-worthy pie, golden-brown and audibly crispy, with a chewy, airy interior. And the best part? One pan to wash. This is the pizza that ends the “takeout or delivery” debate forever.

Why This Single-Skillet Wonder is Your New Best Friend
Let’s be real. Making pizza at home can feel like a project. You need a pizza stone, a peel, and the patience of a saint. This recipe strips away the fuss and delivers pure, unadulterated pizza joy. The homemade dough is forgiving and requires no special equipment. The cast iron does the heavy lifting, creating an incredible sear on the bottom crust that mimics the floor of a wood-fired oven. It’s a one-pan symphony of flavor and texture that feels incredibly fancy but is secretly, wonderfully simple. This is the recipe you’ll make for friends, for yourself on a cozy night in, and for anyone who claims homemade pizza is too much work.
Recommended Product

The Secret Weapon: The Science of the Cast Iron Crust
Why does pizza from a cast iron skillet taste so profoundly different? It’s all about heat retention and conduction. Unlike a thin baking sheet that warps and cools, cast iron acts like a thermal battery. It absorbs the oven’s intense heat and holds it, delivering a relentless, even bake from below. This creates two magical effects simultaneously: a **blistering hot surface** that instantly sears the dough, locking in steam and creating a crispy, caramelized bottom (we call this the “leopard spotting” in the pizza world), and a radiant heat that cooks the toppings gently without burning them. The high, sloped sides of the skillet also create a natural “steam wall” around the pizza, mimicking the humid environment of a professional pizza oven, which results in a beautifully airy and tender crumb. It’s not magic; it’s brilliant physics.
🍳 Used in this recipe
Get It on Amazon Basics✔ Free Delivery | ✔ Top Rated | ✔ Budget-FriendlyWhat You Need to Raid From the Pantry
This ingredient list is a study in beautiful simplicity. No obscure items, just honest food that delivers big flavor. The dough is the star, so we’ll treat it with the respect it deserves.
**For the No-Fuss, High-Hydration Dough:**
* 2 ¼ teaspoons (1 packet) active dry yeast
* 1 ¼ cups warm water (about 110°F, like a warm bath)
* 1 teaspoon honey or sugar (to wake up the yeast)
* 3 ½ cups bread flour (or all-purpose flour; bread flour gives a chewier result)
* 2 tablespoons extra virgin olive oil, plus more for the bowl
* 2 teaspoons fine sea salt
**For the Simple, Stunning Toppings:**
* 1 cup your favorite pizza sauce (store-bought is fantastic here, or use a simple crushed tomato blend)
* 8 oz low-moisture mozzarella cheese, shredded (pre-shredded works, but block cheese melts better)
* ¼ cup grated Parmesan cheese
* **Flavor Makers:** Fresh basil leaves, sliced pepperoni, sautéed mushrooms, or anything your heart desires.
* A drizzle of high-quality olive oil for finishing
🍳 Used in this recipe
Get It on Amazon Basics✔ Free Delivery | ✔ Top Rated | ✔ Budget-FriendlyLet’s Get Cooking: The Step-by-Step
The process is therapeutic. You’ll feel like a kitchen wizard. Don’t rush the rise—patience here pays off in flavor and texture.
Step 1: Awaken the Yeast
In a large bowl, combine the warm water, yeast, and honey. Let it sit for 5-10 minutes until it becomes foamy and fragrant. If it doesn’t foam, your yeast might be tired—start over. This is your flavor foundation.
Step 2: Mix and Knead (Briefly!)
Add the flour, olive oil, and salt to the yeast mixture. Stir with a wooden spoon until a shaggy dough forms. Now, turn it out onto a lightly floured surface. Knead for just 5-7 minutes until it’s smooth and elastic. It should be slightly tacky but not sticky. This isn’t bread—it just needs to come together.
🍳 Used in this recipe
Get It on Amazon Basics✔ Free Delivery | ✔ Top Rated | ✔ Budget-FriendlyStep 3: The Patient Rise
Lightly oil your mixing bowl, plop the dough back in, and cover it with a damp cloth or plastic wrap. Let it rise in a warm, draft-free spot for 60-90 minutes, or until doubled in size. This is where the air pockets and chewy texture are born.
Step 4: Shape and Rest
Gently punch down the dough (therapeutic!) and divide it into two equal balls for two 10-inch pizzas, or keep it whole for one large one. On a lightly floured surface, press and stretch the dough into a rough circle. Don’t worry about perfection. Let the shaped dough rest for 15 minutes—this relaxes the gluten, making it easier to stretch into the skillet.
Step 5: The Skillet Sizzle
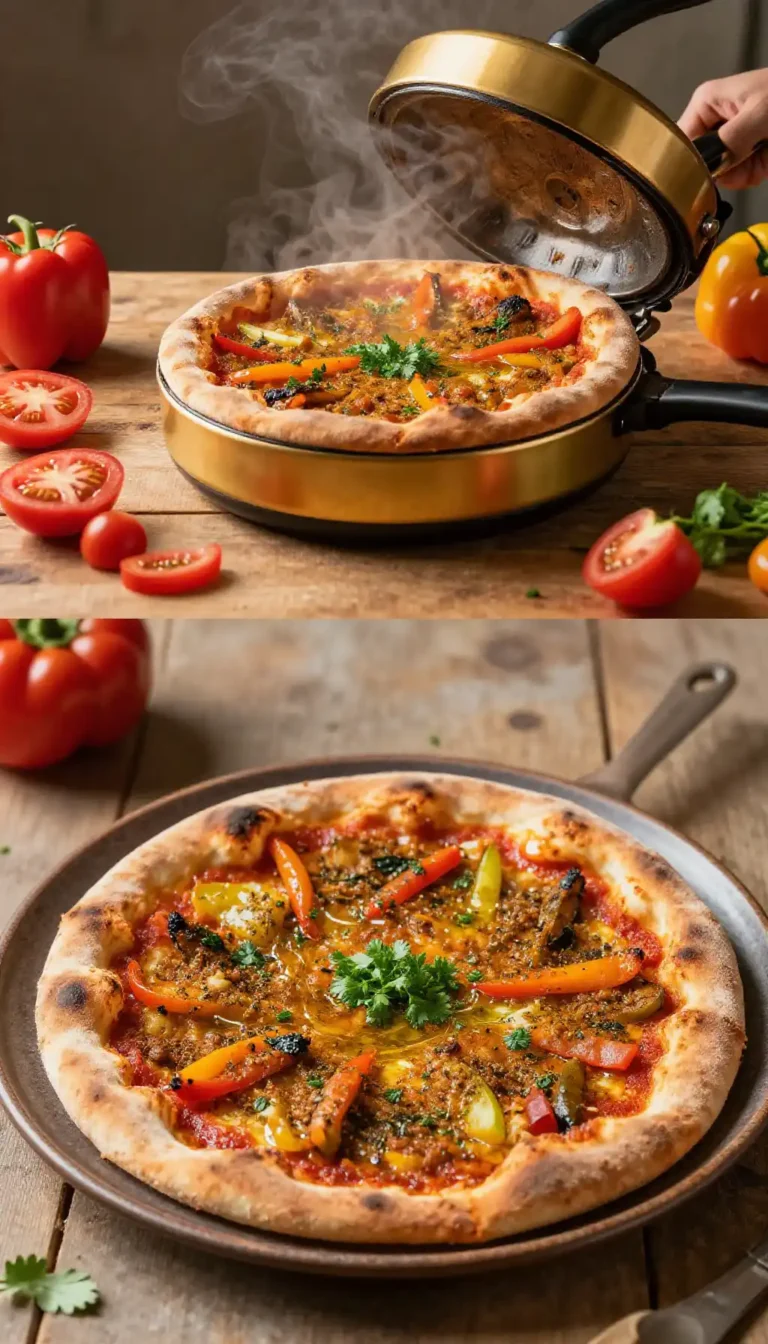
Preheat your oven to 475°F (245°C) with a rack in the lower-middle position. Place your 10- or 12-inch cast iron skillet in the oven as it heats. Once the oven is hot, carefully remove the skillet (use an oven mitt!) and drizzle about 1 tablespoon of olive oil into it, swirling to coat the bottom and sides. Immediately place your stretched dough into the hot skillet. It will sizzle—that’s the sound of victory! Press the dough up the sides slightly. Work quickly.
🍳 Used in this recipe
Get It on Amazon Basics✔ Free Delivery | ✔ Top Rated | ✔ Budget-FriendlyStep 6: Top and Bake
Spread your sauce over the dough, leaving a small border for the crust. Scatter the mozzarella and Parmesan. Add your chosen toppings. Slide the skillet back into the oven. Bake for 12-18 minutes, rotating the pan halfway through, until the crust is deeply golden and the cheese is bubbly and spotted.
Step 7: The Finishing Touch
Remove the skillet from the oven (remember the handle is HOT!). Let the pizza rest in the pan for 3-5 minutes—this allows the cheese to set. Use a spatula to loosen the edges and slide the pizza onto a cutting board. Drizzle with more olive oil, scatter fresh basil, slice, and serve.

How NOT to Mess This Up: Common Pitfalls
Even the simplest recipes have their quirks. Here’s how to sidestep the usual suspects.
🍳 Used in this recipe
Get It on Amazon Basics✔ Free Delivery | ✔ Top Rated | ✔ Budget-Friendly* **The Sticky Situation:** If your dough is unmanageably sticky, resist the urge to add a mountain of flour. Instead, lightly oil your hands and work surface. A little tackiness is good for a tender crust.
* **The Pale Crust Blues:** A sad, pale bottom crust is often due to a cold skillet or insufficient heat. Ensure your skillet is screaming hot from the oven before the dough hits the oil. Don’t skip the preheat!
* **The Soggy Center:** Overloading on sauce or wet toppings is the enemy. Use sauce sparingly and pat down any watery veggies (like fresh tomatoes or mushrooms) before adding them.
* **The Stuck Pizza:** A well-seasoned skillet is your best friend. If you’re nervous, use a bit more oil in the pan before the dough goes in. Let it bake fully—the crust will release naturally when it’s done.
Recommended Product
 -15%
-15%
Silicone Baking Mat with Measurement Guide (Non-Stick Pastry & Cake Mat)
- Material →: Food-grade silicone (safe for baking)
- Surface →: Non-stick (no butter or oil needed)
- Design →: Measurement guide for perfect cake sizes
Serving Vibes: Setting the Scene
This pizza is a chameleon. It’s the ultimate **rainy-day comfort food**, steaming up the windows and filling the house with an irresistible aroma. It’s also a **heroic party dish**—make a few and let guests customize their own. Pair it with a simple arugula salad dressed with lemon vinaigrette to cut through the richness. For a movie night, serve it straight from the skillet (on a trivet!) with cold sparkling water. It’s rustic, communal, and deeply satisfying. This isn’t a meal; it’s an event.
Leftovers? Here’s the Plan
If you somehow have leftovers (a rare occurrence), store them in an airtight container in the fridge for up to 3 days. To reheat, skip the microwave, which makes the crust rubbery. Instead, place slices in a dry skillet over medium-low heat until the crust crisps up and the cheese melts, about 5-7 minutes. You can also re-crisp it in a 375°F oven for 8-10 minutes.
🍳 Used in this recipe
Get It on Amazon Basics✔ Free Delivery | ✔ Top Rated | ✔ Budget-FriendlyThe Pizza Intel: Your Questions, Answered
How to freeze Easy Cast Iron Skillet Pizza with Homemade Crust?
This is a fantastic freezer meal! Bake the pizza as directed and let it cool completely. Slice it and wrap each piece tightly in plastic wrap, then place in a freezer bag. Freeze for up to 3 months. To reheat, place a frozen slice on a baking sheet in a 400°F oven for 10-12 minutes until hot and crispy.
What are the calories in Easy Cast Iron Skillet Pizza with Homemade Crust?
Calories vary based on toppings, but a typical slice (1/8th of a 10-inch pizza) with cheese and sauce is approximately 250-300 calories. Using whole wheat flour or loading up on veggies can adjust this number.
Can I make the dough ahead of time?
Absolutely! This dough is perfect for planning. After the first rise, punch it down, wrap the ball tightly in plastic, and refrigerate for up to 3 days. Let it come to room temperature for 30 minutes before shaping and baking. The flavor actually improves with a slow, cold ferment.
🍳 Used in this recipe
Get It on Amazon Basics✔ Free Delivery | ✔ Top Rated | ✔ Budget-FriendlyMy crust isn’t crispy. What went wrong?
Two likely culprits: the skillet wasn’t hot enough before you added the dough, or you placed it on a cold baking sheet in the oven. Always preheat the skillet in the oven. For extra crispiness, place the skillet directly on the oven rack during the last 2-3 minutes of baking (be careful!).
Recommended Product
 -11%
-11%
8‑Piece Deep Glass Baking Dish Set with Plastic Lids (Rectangular Bakeware)
- Material: Oven, freezer & microwave safe borosilicate glass (goes from fridge/oven without cracking)
- Pieces →: 4 rectangular dishes + 4 tight‑fitting plastic lids (stackable)
- Easy Care →: Dishwasher safe glass & lids
Do I need a special 10-inch skillet?
Any oven-safe, well-seasoned cast iron skillet will work. A 10-12 inch skillet is ideal for one large pizza. If your skillet is smaller, just make two smaller pizzas. The key is the material, not the exact size.
Easy Cast Iron Skillet Pizza with Homemade Crust
Ingredients
Ingredients
- 1.5 cups all-purpose flour plus extra for dusting
- 1 tsp instant yeast
- 1 tsp sugar
- 0.5 tsp salt
- 0.5 cup warm water about 110°F
- 2 tbsp olive oil divided
- 0.5 cup pizza sauce store-bought or homemade
- 1.5 cups shredded mozzarella cheese
- 0.25 cup grated Parmesan cheese
- 0.5 cup fresh basil leaves torn, for garnish
- 1 tsp Italian seasoning optional, for the crust