When Your Kitchen Smells Like a Parisian Boulangerie on a Rainy Tuesday
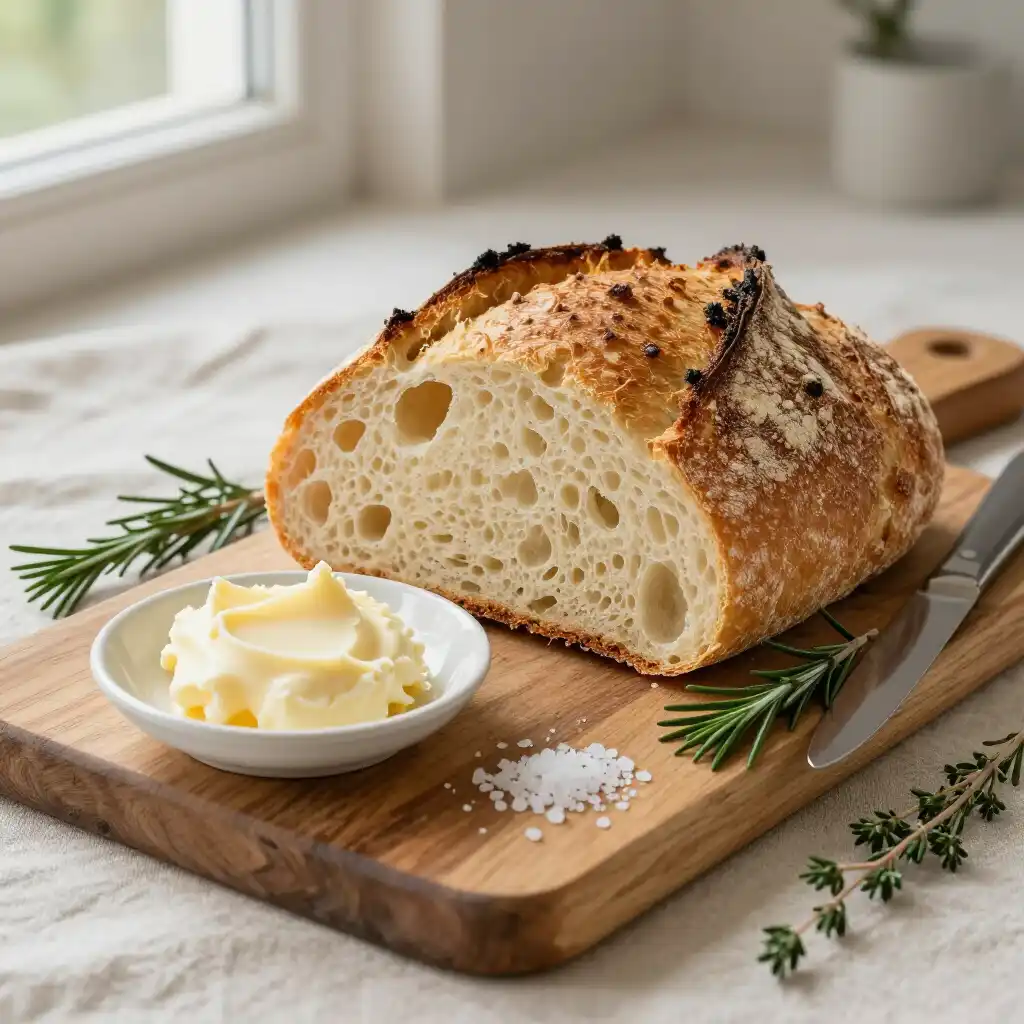
Let’s be honest. Most days, my kitchen smells like last night’s garlic stir-fry and the faint, tragic ghost of burnt toast. But on the days I bake this bread? The entire house transforms. It’s a warm, yeasty hug that wraps around every corner, a promise of golden crust and a crumb so open and airy it practically floats. There’s no fancy technique, no medieval-level kneading ritual. It’s just flour, water, salt, and time working their quiet magic. And when you pull that loaf from the Dutch oven, the crackle of the crust is the most satisfying sound you’ll hear all week.
This isn’t just bread. It’s edible confidence.
Recommended Product

The Four-Pantheon Ingredient List
You don’t need a pantry full of obscure flours. This is the minimalist’s dream. Here’s your shopping list, or rather, your raid-the-pantry list.
🍳 Used in this recipe
Get It on Amazon Basics✔ Free Delivery | ✔ Top Rated | ✔ Budget-Friendly* **Flour:** All-purpose flour is your steadfast friend here. It creates a balanced loaf that’s both tender and substantial. If you’re feeling adventurous, a 50/50 split with bread flour will give you an even chewier, more open crumb.
* **Yeast:** The single, glorious packet of instant yeast. It’s our lazy-day hero, requiring no pre-activation in warm water. Just toss it in with the dry goods.
* **Salt:** Fine sea salt dissolves evenly and seasons every single bite. It’s not just a flavor enhancer; it controls the yeast’s rate of fermentation, leading to a better texture and deeper flavor.
* **Water:** Use warm water (around 100-110°F) to wake up the yeast. If your water is too hot, you’ll kill the little guys. Too cold, and they’ll stay sleepy.
That’s it. Four humble ingredients that, with a little patience, become a masterpiece.
The Science of the Lazy Rise (And Why It’s a Good Thing)
You might wonder, “How can something with no kneading possibly develop gluten and structure?” The secret isn’t in the muscle; it’s in the clock. This method is a masterclass in **hydration and time**.
🍳 Used in this recipe
Get It on Amazon Basics✔ Free Delivery | ✔ Top Rated | ✔ Budget-FriendlyWhen you mix flour and water, gluten strands begin to form. In a kneaded dough, you’re physically stretching and aligning those strands into a tight, elastic network. In our no-knead dough, the high hydration (more water than a standard bread dough) does the work for us. The water slowly penetrates the flour, allowing gluten proteins to find each other and link up on their own terms, creating a strong, flexible web over a long, slow fermentation period.
This extended rise (typically 12-18 hours) isn’t just about convenience. It’s a flavor factory. As the yeast slowly consumes the sugars in the flour, it produces complex organic acids and alcohols (the good, edible kind!). This is what gives artisan bread its signature tangy, nuanced flavor profile that you simply can’t get from a quick, one-hour rise. The yeast does all the heavy lifting while you sleep, work, or binge-watch your favorite show.
Let’s Get Cooking: The Foolproof Method
Ready to make magic? Grab a bowl, a spatula, and your trusty Dutch oven.
🍳 Used in this recipe
Get It on Amazon Basics✔ Free Delivery | ✔ Top Rated | ✔ Budget-Friendly**Step 1: The Simple Mix.**
In a large bowl, whisk together your flour, yeast, and salt. Pour in the warm water. Using a spatula or your hands, mix until a shaggy, sticky, and gloriously messy dough forms. There should be no dry flour spots. Don’t panic if it looks too wet—that’s exactly what we want.
**Step 2: The Patient Wait.**
Cover the bowl tightly with plastic wrap or a damp kitchen towel. Let it sit on your counter at room temperature for **12 to 18 hours**. You’ll know it’s ready when the surface is dotted with bubbles, it has doubled in size, and it smells deeply, wonderfully yeasty.
**Step 3: The Gentle Shaping.**
Lightly flour a clean surface and turn the dough out. It will be loose and sticky. With floured hands, gently fold the edges of the dough into the center a few times to form a rough ball. Let it rest on the floured surface, covered, for 30 minutes.
🍳 Used in this recipe
Get It on Amazon Basics✔ Free Delivery | ✔ Top Rated | ✔ Budget-Friendly**Step 4: The Preheated Throne.**
While the dough rests, place your Dutch oven (with its lid on) into the oven and preheat to 450°F (230°C). This is non-negotiable. A screaming-hot Dutch oven is the key to that explosive oven spring and crisp crust.
**Step 5: The Baking Ritual.**
Carefully remove the hot Dutch oven. Plop your dough ball into the center (it’s okay if it’s a little lopsided). Cover with the lid and place it back in the oven. Bake for **30 minutes with the lid on**. Then, remove the lid (beware the burst of steam!) and bake for another **15-20 minutes** until the crust is a deep, burnished golden brown.
**Step 6: The Cooling (The Hardest Part).**
Transfer the loaf to a wire rack. You must let it cool completely before slicing, at least one hour. If you cut it too soon, the steam trapped inside will make the crumb gummy. The wait is torture, but it’s worth it.
🍳 Used in this recipe
Get It on Amazon Basics✔ Free Delivery | ✔ Top Rated | ✔ Budget-Friendly
Common Pitfalls & How to Sidestep Them
Even a foolproof recipe has its traps. Here’s how to avoid the most common bread blunders.
* **The Impatience Trap:** Using the dough before it’s fully risen is like waking a bear from hibernation. It won’t have the energy to rise in the oven. If you’re short on time, a 12-hour rise is the absolute minimum. For the best flavor and texture, 18 hours is golden.
* **The Scorching Fear:** When you remove the Dutch oven lid, the top of the bread might brown quickly. This is normal! If it’s getting too dark before the inside is done, tent a piece of aluminum foil loosely over the top for the final 10 minutes of baking.
* **The Wrong Vessel:** A regular baking sheet won’t give you the same results. The Dutch oven traps steam released from the dough, creating a humid environment that allows the bread to expand fully before the crust sets. No Dutch oven? A heavy, oven-safe pot with a tight-fitting lid will work in a pinch.
* **The Preheating Skip:** Skipping the preheat is the #1 reason for a flat, dense loaf. The shock of the hot pot is what creates the initial burst of steam and lift. Don’t skip it!
Serving Vibes: Setting the Scene
This bread is a chameleon. It adapts to your mood.
🍳 Used in this recipe
Get It on Amazon Basics✔ Free Delivery | ✔ Top Rated | ✔ Budget-Friendly**The Cozy Rainy Day:** Slice a thick piece, slather it with creamy butter and a drizzle of honey. Pair it with a steaming bowl of tomato soup and watch the rain fall outside. This is comfort food at its finest.
**The Feast with Friends:** This loaf is the star of any bread basket. Tear it into rustic chunks and serve with a dish of high-quality olive oil for dipping, infused with garlic and herbs. It’s the perfect vehicle for a creamy cheese board or a robust vegetable stew.
**The Simple Morning Toast:** Day-old bread? Even better. Toast thick slices until the edges are dark and crisp. Top with smashed avocado, a sprinkle of chili flakes, and a squeeze of lemon. It’s a breakfast that feels both rustic and refined.
🍳 Used in this recipe
Get It on Amazon Basics✔ Free Delivery | ✔ Top Rated | ✔ Budget-FriendlyRecommended Product

Amazon Basics Silicone Baking Mat (2-Pack Non-Stick Oven Liners)
- Material →: Food-safe silicone, reusable thousands of times
- Non-Stick →: No butter, oil, or parchment needed
The beauty of this **Easy No-Knead Artisan Dutch Oven Bread** is its versatility. It’s not precious. It’s meant to be torn, shared, and enjoyed without ceremony.
The Crumb Line: Your Questions Answered
How do I store Easy No-Knead Artisan Dutch Oven Bread?
The crust is your bread’s best friend and worst enemy for storage. It keeps the interior fresh but will soften over time. For short-term (2-3 days), store it in a paper bag or a bread box at room temperature to keep the crust crisp. For longer storage, slice it, wrap it tightly in plastic wrap, and freeze it for up to 3 months.
How to freeze Easy No-Knead Artisan Dutch Oven Bread?
This is the best way to preserve that just-baked magic. First, let the loaf cool completely. Slice it first for convenience, or freeze the whole loaf. Wrap the slices or the whole loaf tightly in plastic wrap, then again in aluminum foil or a freezer bag to prevent freezer burn. To thaw, leave it on the counter for a few hours or toast slices directly from frozen.
🍳 Used in this recipe
Get It on Amazon Basics✔ Free Delivery | ✔ Top Rated | ✔ Budget-FriendlyWhat are the calories in Easy No-Knead Artisan Dutch Oven Bread?
A typical slice of this homemade bread (about 1/12th of the loaf) contains roughly 150-180 calories, depending on the exact size and flour used. The beauty of making it yourself is that you control the ingredients—no preservatives or hidden sugars, just pure, simple nourishment.
Can I use whole wheat flour?
Absolutely! For a heartier loaf, substitute up to 50% of the all-purpose flour with whole wheat. Note that whole wheat flour absorbs more liquid, so you may need to add a tablespoon or two more water to achieve the same shaggy consistency. The loaf will be denser and have a nuttier flavor.
Recommended Product
 -11%
-11%
8‑Piece Deep Glass Baking Dish Set with Plastic Lids (Rectangular Bakeware)
- Material: Oven, freezer & microwave safe borosilicate glass (goes from fridge/oven without cracking)
- Pieces →: 4 rectangular dishes + 4 tight‑fitting plastic lids (stackable)
- Easy Care →: Dishwasher safe glass & lids
Why is my crust not as crispy as I’d like?
Two likely culprits: the Dutch oven wasn’t hot enough, or you didn’t bake it long enough with the lid off. Make sure your oven is fully preheated with the Dutch oven inside for at least 45 minutes. Don’t be afraid to give it those final 15-20 minutes uncovered until it’s a deep, dark golden brown. The color is your guide to crispiness!
🍳 Used in this recipe
Get It on Amazon Basics✔ Free Delivery | ✔ Top Rated | ✔ Budget-FriendlyReady to try it yourself? Find the full details at this link for **[Easy No-Knead Artisan Dutch Oven Bread](https://slapid.com/recipes/easy-no-knead-artisan-dutch-oven-bread-recipe/)**. And for a visual guide and more inspiration, check out this collection on **[Pinterest](https://www.pinterest.com/search/pins/?q=easy%20no-knead%20artisan%20dutch%20oven%20bread%20recipe)**. Happy baking

Easy No-Knead Artisan Dutch Oven Bread
Ingredients
Ingredients
- 3 cups all-purpose flour plus extra for dusting
- 1 1/2 tsp fine sea salt
- 1/2 tsp instant yeast
- 1 1/2 cups warm water about 105-110°F