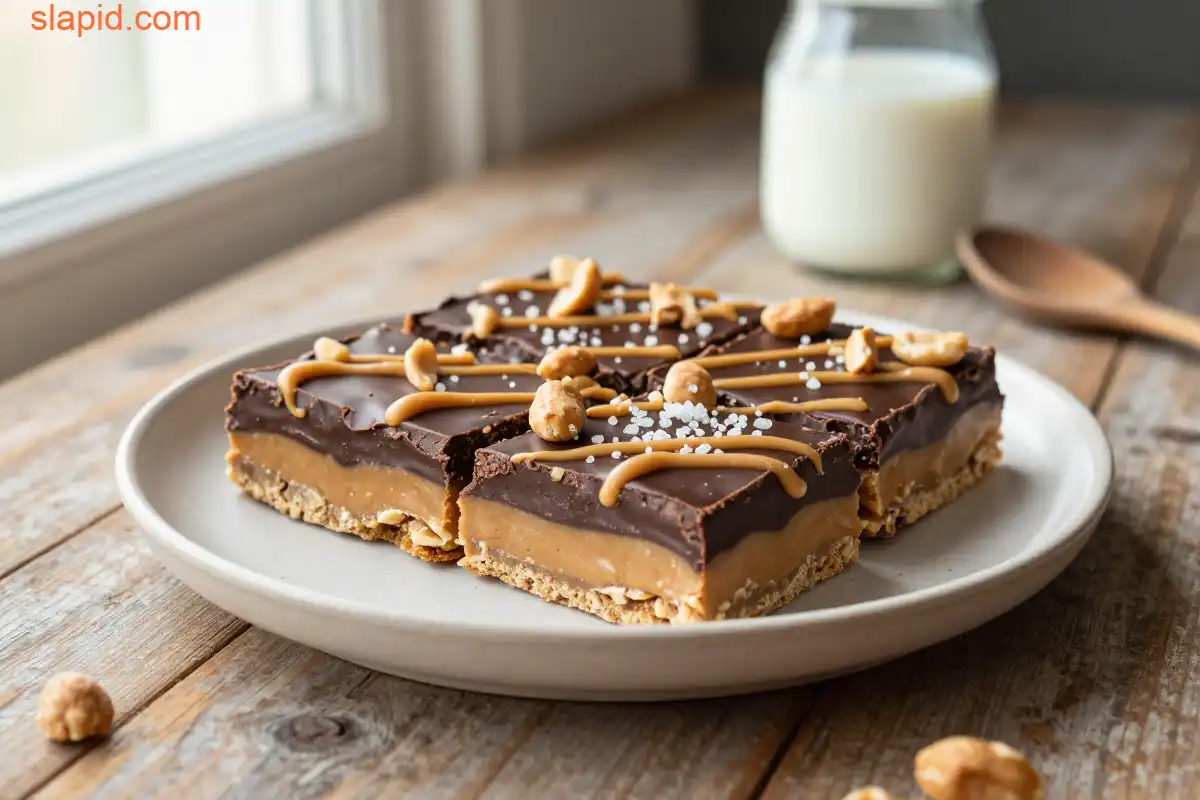
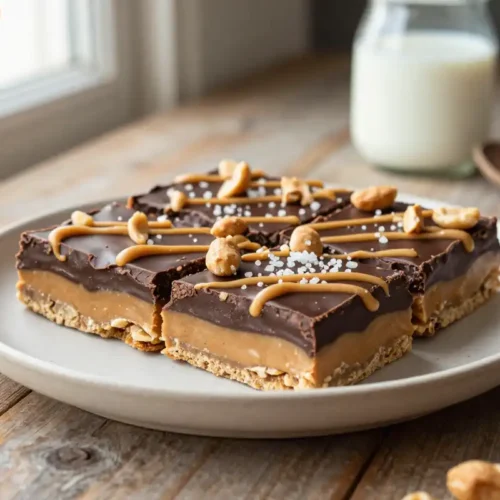
The Emergency Chocolate Bar You Didn’t Know You Needed
Let me paint you a picture. It’s 3 PM. The afternoon slump has hit you like a sack of flour. Your brain is foggy, your energy is a flatline, and you’re staring blankly at your computer screen. Suddenly, a craving hits. Not just any craving. It’s a deep, primal, peanut-butter-and-chocolate-and-something-creamy-and-something-crunchy kind of craving. You need a fix. Fast. You don’t have time to preheat an oven, measure flour with the precision of a chemist, or wait an hour for something to bake. You need a solution that’s as immediate as your need for sweetness. This, my friends, is where these Easy No-Bake Peanut Butter Chocolate Bars swoop in like a superhero in a cape made of parchment paper.
I’ve made these bars more times than I can count. For last-minute potlucks, for late-night movie binges, for “I survived another Tuesday” rewards. They never, ever fail. The moment you press that peanut-butter-laden crumb base into the pan, you’ll smell the toasty, salty-sweet aroma. It’s the smell of imminent satisfaction. And when you take that first bite? It’s a textural symphony. The gentle crackle of the chocolate shell gives way to a creamy, dense, unapologetically rich peanut butter layer, all resting on a buttery, crunchy biscuit foundation. It’s the dessert equivalent of a perfect hug.
Recommended Product
 -11%
-11%
8‑Piece Deep Glass Baking Dish Set with Plastic Lids (Rectangular Bakeware)
- Material: Oven, freezer & microwave safe borosilicate glass (goes from fridge/oven without cracking)
- Pieces →: 4 rectangular dishes + 4 tight‑fitting plastic lids (stackable)
- Easy Care →: Dishwasher safe glass & lids
The Flavor Makers (AKA Your Shopping List)
This isn’t a recipe that demands a trip to a specialty store. Its power lies in its glorious simplicity. The magic happens in your pantry and your freezer. Here’s the holy trinity of ingredients that make this all happen.
🍳 Used in this recipe
Get It on Amazon Basics✔ Free Delivery | ✔ Top Rated | ✔ Budget-Friendly* **The Crunchy Foundation:** You’ll need a sturdy biscuit. Think digestive biscuits, shortbread, or even graham crackers if you’re feeling American classic. We’re not making a delicate crumb here; we need texture that holds its own. We blitz these into a coarse, sandy meal, then bind them with melted butter. That’s your base. It’s the unsung hero, the stage upon which the main act will perform.
* **The Creamy Main Event:** This is non-negotiable: **good-quality creamy peanut butter**. The kind that stirs up silky smooth. Not the natural, oil-separating kind for this particular recipe (that can make the layer a bit too loose). We’re looking for that classic, nostalgic, spreadable consistency. We’ll mix it with powdered sugar and a touch of vanilla to create a layer so lush, you’ll want to eat it with a spoon.
* **The Grand Finale:** The chocolate layer. You can use semi-sweet or dark chocolate chips. We melt them with a bit of coconut oil (or another neutral oil) for a few crucial reasons. The oil gives the chocolate a beautiful sheen, prevents it from being too brittle, and makes it slice cleanly without shattering into a million tiny pieces. It’s a small trick with a massive payoff.
The Secret Science of No-Bake Bliss
So, how does this concoction of simple ingredients set into a perfect, sliceable bar without any heat? It’s all about the magic of crystallization and fat networks. When you melt chocolate, you’re breaking down its crystal structure. As it cools in the refrigerator, those crystals want to reform. The fat from the peanut butter and the added oil in the chocolate encourage a smooth, stable crystal network to form. It’s a process called tempering, but on the easiest, most forgiving scale imaginable.
The powdered sugar in the peanut butter layer isn’t just for sweetness. It absorbs any tiny amount of moisture from the peanut butter, creating a firm, fudge-like consistency that doesn’t ooze out the sides when you cut it. It’s the glue that holds the creamy dream together. And the biscuit base? Its job is to provide a solid, non-soggy barrier. The butter coats the crumbs, and when chilled, that butter solidifies, creating a firm, crunchy layer that contrasts beautifully with the soft layers above. It’s food science you can taste.
🍳 Used in this recipe
Get It on Amazon Basics✔ Free Delivery | ✔ Top Rated | ✔ Budget-FriendlyHow to Make Easy No-Bake Peanut Butter Chocolate Bars: The Step-by-Step
This is a process of layering, not a complex ballet. Follow these steps, and you’ll be a no-bake champion.
1. **Build Your Base:** Line an 8×8 inch baking pan with parchment paper, leaving an overhang on two sides. This is your insurance policy for easy removal. In a food processor or a sturdy zip-top bag, crush your biscuits into a mix of fine crumbs and small, pea-sized chunks. Melt your butter and stir it into the crumbs until everything is evenly moistened. Press this mixture firmly and evenly into the bottom of your prepared pan. The key here is *firm* pressure. Use the bottom of a measuring cup to get it compact. Pop this into the freezer for 10 minutes to set. A cold base makes adding the next layer infinitely easier.
2. **Whip Up the Peanut Butter Layer:** In a medium bowl, combine the creamy peanut butter, powdered sugar, and vanilla extract. If your peanut butter is straight from the pantry, give it a good stir first. Mix until it’s completely smooth. No lumps of sugar allowed! Spread this glorious, sticky mixture over your chilled biscuit base. Use an offset spatula or the back of a spoon to get it into the corners and create an even layer. Return the pan to the freezer for another 15-20 minutes. This step is crucial for clean layers.
3. **Create the Chocolate Shell:** Place your chocolate chips and coconut oil in a microwave-safe bowl. Microwave in 30-second bursts, stirring well after each, until the chocolate is fully melted and smooth. Alternatively, use a double boiler. Let it cool for just a minute or two—you don’t want it to melt the peanut butter layer, but you want it pourable.
4. **Assemble and Chill:** Pour the melted chocolate over the chilled peanut butter layer. Gently tilt the pan to spread it into an even blanket. You can sprinkle with a little flaky sea salt now for a salty-sweet kick. Refrigerate the entire pan for at least 2 hours, or until the chocolate is completely firm. When ready to serve, use the parchment paper overhang to lift the entire block out of the pan. Place it on a cutting board and slice into bars with a sharp knife, running the knife under hot water and drying it between cuts for super clean edges.
Pro-Tip: The Temperature Tango
Here’s the biggest secret to getting those gorgeous, distinct layers: **temperature control**. Don’t rush the chilling steps. Letting the base and the peanut butter layer firm up in the freezer before adding the next component is what prevents a muddy, swirled mess. You’re building a skyscraper; you need each floor to be solid before adding the next.
🍳 Used in this recipe
Get It on Amazon Basics✔ Free Delivery | ✔ Top Rated | ✔ Budget-Friendly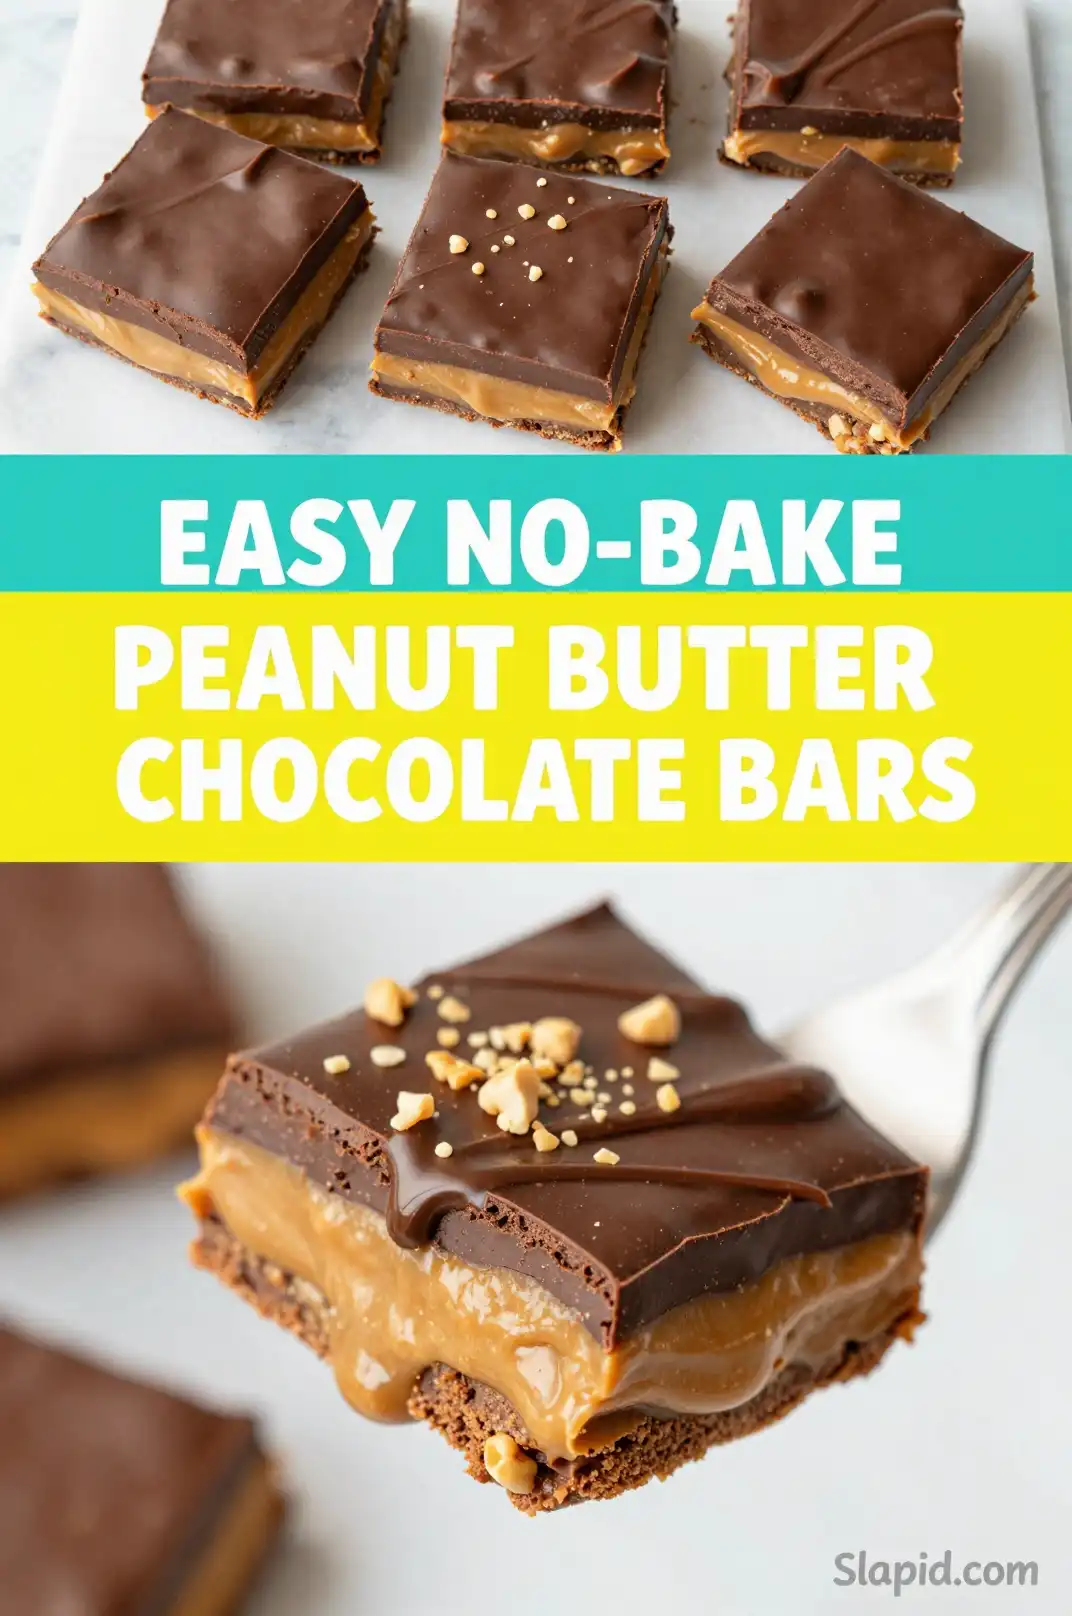
How NOT to Mess These Up (A Friendly Warning)
Even the simplest recipes have their pitfalls. Consider this your cheat sheet for avoiding dessert disappointment.
First, **do not use a liquid sweetener like honey or maple syrup in the peanut butter layer**. It will make the layer too soft and sticky, and it may never set properly. Powdered sugar is your friend here for a reason—it provides structure.
Second, **overheating your chocolate is a cardinal sin**. Chocolate is delicate. Burn it, and the texture becomes grainy and unpleasant. Low and slow, with constant stirring, is the way to go. The coconut oil is your safety net, making the chocolate more forgiving.
🍳 Used in this recipe
Get It on Amazon Basics✔ Free Delivery | ✔ Top Rated | ✔ Budget-FriendlyThird, **impatience is the enemy**. If you try to slice these before they’re fully chilled, you’ll have a gooey, messy situation on your hands. The freezer is your best friend. If you’re in a real hurry, a minimum of 2 hours in the fridge is essential, but overnight is even better for a perfect set.
Setting the Scene: The Perfect Vibe for These Bars
These bars are versatile. They’re the ultimate “I need a win” dessert on a rainy Tuesday. Pair them with a glass of cold milk or a strong black coffee, and you’ve got the ultimate comfort combo. The bitter notes of the coffee cut through the sweetness of the chocolate and peanut butter beautifully.
Recommended Product
 -15%
-15%
Silicone Baking Mat with Measurement Guide (Non-Stick Pastry & Cake Mat)
- Material →: Food-grade silicone (safe for baking)
- Surface →: Non-stick (no butter or oil needed)
- Design →: Measurement guide for perfect cake sizes
But they also shine at gatherings. They’re fantastic for birthday parties (especially for kids who love peanut butter), potlucks, and holiday cookie exchanges. Because they’re sturdy, they travel well. Make them the day before your event, slice them, and pack them in a single layer in an airtight container. They’re a guaranteed crowd-pleaser, and no one will ever guess how effortless they were to create. For more inspiration on effortless desserts, check out this collection of no-bake dessert ideas on Pinterest.
🍳 Used in this recipe
Get It on Amazon Basics✔ Free Delivery | ✔ Top Rated | ✔ Budget-FriendlyLeftovers? Here’s the Plan
If you somehow have leftovers (a rare occurrence in my kitchen), storage is simple. Place the bars in a single layer in an airtight container. They’ll keep perfectly in the **refrigerator for up to a week**. The texture is fantastic cold, but if you prefer a slightly softer bite, let them sit at room temperature for 10-15 minutes before eating.
**To freeze Easy No-Bake Peanut Butter Chocolate Bars**, this is the best method: Once fully set, slice the bars. Place the slices on a parchment-lined baking sheet, making sure they don’t touch. Freeze until solid (about 1 hour), then transfer them to a freezer-safe bag or container with parchment paper between layers. They’ll keep for up to 3 months. Thaw in the refrigerator for a few hours or at room temperature for about 30 minutes. This method prevents them from sticking together in a giant, frozen clump.
Your Peanut Butter Chocolate Bar Questions, Answered
Let’s tackle the most common queries head-on. This is everything you need to know to make this recipe your own.
🍳 Used in this recipe
Get It on Amazon Basics✔ Free Delivery | ✔ Top Rated | ✔ Budget-FriendlyCan I use crunchy peanut butter instead of creamy?
Absolutely! If you love extra texture, swapping creamy for crunchy peanut butter will add a delightful nutty crunch to the middle layer. The recipe works just as well. The only difference is the mouthfeel—you’ll get little bits of peanut in every bite, which many people prefer.
How many calories are in Easy No-Bake Peanut Butter Chocolate Bars?
Let’s be real: this is a decadent treat, not a health food. A rough estimate for a standard bar (assuming the recipe makes 16 bars) would be around **250-300 calories each**. This can vary based on the specific brands of biscuits, peanut butter, and chocolate you use. They’re rich and satisfying, so one bar is usually plenty to curb any sweet craving.
My chocolate layer is too thick. Can I thin it out?
Yes, and this is where the coconut oil comes in handy. If your melted chocolate seems too thick for easy pouring, add another teaspoon of coconut oil and stir until smooth. It will give the chocolate a slightly softer set, but it will still cut cleanly. Alternatively, you can use a bit more oil when melting the chocolate chips.
🍳 Used in this recipe
Get It on Amazon Basics✔ Free Delivery | ✔ Top Rated | ✔ Budget-FriendlyDo I have to use the coconut oil? Can I skip it?
You can skip it, but I highly recommend it. Without the oil, the chocolate shell will be more brittle and can crack or shatter when you try to slice it. The oil gives the chocolate a beautiful gloss and a more forgiving, snappy texture. If you don’t have coconut oil, you can use a neutral vegetable oil (like canola or sunflower) in the same amount.
Recommended Product
Amazon Basics Silicone Baking Mat (2-Pack Non-Stick Oven Liners)
- Material →: Food-safe silicone, reusable thousands of times
- Non-Stick →: No butter, oil, or parchment needed
Are these bars freezer-friendly?
They are! As mentioned above, they freeze beautifully. For the best results, freeze the whole slab or individual bars on a tray first, then wrap them tightly and store them in an airtight container. This keeps them from absorbing freezer odors and prevents freezer burn. They’re a perfect make-ahead dessert for unexpected guests or future cravings.
Now you have the blueprint for the easiest, most satisfying dessert that requires zero oven time. It’s a recipe built on pantry staples, a little bit of science, and a whole lot of joy. So go on, raid your cupboards, and create a little bit of no-bake magic. Your future self, especially that 3 PM version of you, will be eternally grateful. For the full, easy-to-print version, you can always find the recipe right here on Slapid.com. Happy no-baking
Easy No-Bake Peanut Butter Chocolate Bars
Ingredients
Ingredients
- 1 cup creamy peanut butter natural or regular, at room temperature
- 1/2 cup unsalted butter melted
- 1 cup powdered sugar sifted
- 2 cups graham cracker crumbs about 14 full sheets
- 1 cup semi-sweet chocolate chips or chopped chocolate bars
- 2 tbsp creamy peanut butter for topping
- 1/4 cup chopped peanuts optional, for garnish
Notes
🍳 Used in this recipe
Get It on Amazon Basics✔ Free Delivery | ✔ Top Rated | ✔ Budget-Friendly