The Sound of a Perfect Crust
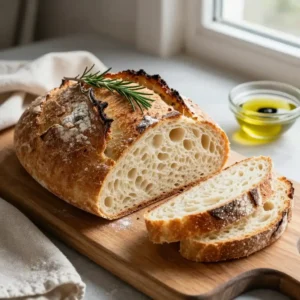
There is a sound that makes every home baker’s heart skip a beat. It’s not a ding or a timer. It’s the *crack*. The moment you lift the lid of a screaming-hot Dutch oven and hear the crust singing as it cools, that’s the moment you know you’ve won at life. Or, at least, at lunch.
This isn’t just bread; it’s an event. It’s the smell of a Parisian bakery magically appearing in your kitchen, filling every corner with the warm, yeasty perfume of pure comfort. And the best part? You didn’t knead for a second. Not one. Your arms can stay relaxed. This is the ultimate kitchen magic trick.
Recommended Product


The Lazy Baker’s Guide to Glory
So, what makes this Easy No-Knead Artisan Dutch Oven Bread the undisputed champion of the bread world? It’s all about leverage. We’re leveraging time instead of muscle. The dough sits happily on its own schedule, developing deep, complex flavors that you simply can’t get from a quick, frantic kneading session.
🍳 Used in this recipe
Get It on Amazon Basics✔ Free Delivery | ✔ Top Rated | ✔ Budget-FriendlyThe Dutch oven is our secret weapon. It acts like a professional steam-injection oven, trapping the moisture released by the dough as it bakes. This steam is what gives you that blistered, crackly, shatteringly crisp crust that gives way to a soft, chewy, open crumb inside. It’s foolproof, it’s ridiculously impressive, and it requires nothing more than four pantry staples and a bit of patience.
The One Ingredient That Does All the Work
Let’s talk about the tiny, beige specks that are about to change your life: yeast. These little organisms are living creatures, and when you feed them flour and water, they get to work. They breathe out tiny bubbles of carbon dioxide gas.
In a normal recipe, you’d punch this dough around to build gluten and trap those bubbles. But in our Easy No-Knead Artisan Dutch Oven Bread, we do something smarter. We give them an incredibly long, slow fermentation (usually 12 to 18 hours). This extended “rest” allows the gluten network to organize itself beautifully on its own, trapping those gas bubbles effortlessly.
🍳 Used in this recipe
Get It on Amazon Basics✔ Free Delivery | ✔ Top Rated | ✔ Budget-FriendlyThe result? An incredibly flavorful, airy interior without you having to lift a finger. The yeast does the heavy lifting; you just get the credit.
What You Need to Raid the Pantry
This is where the simplicity shines. No obscure ingredients, no fancy flours you’ll only use once. Just the basics.
* **Flour:** All-purpose flour works beautifully here. For an even chewier crumb, you can use bread flour, but it’s not a requirement. Don’t overthink it.
* **Water:** Use lukewarm water (around 100-110°F or 38-43°C) to wake up the yeast. Too hot and you’ll kill it. Too cold and it will stay sleepy.
* **Yeast:** A small amount of instant or active dry yeast is your magic fairy dust.
* **Salt:** Absolutely essential. It controls the yeast, strengthens the gluten, and, most importantly, makes the bread taste like something.
🍳 Used in this recipe
Get It on Amazon Basics✔ Free Delivery | ✔ Top Rated | ✔ Budget-FriendlyLet’s Get Cooking: The Step-by-Step
Ready to make bread magic? This is the easiest part of your day.
1. **The Big Mix:** In a large bowl, whisk together your flour, yeast, and salt. Pour in the warm water and mix with a spatula or wooden spoon until you see no dry spots. The dough will be shaggy, sticky, and look like a mess. This is perfect. Walk away.
2. **The Long Nap:** Cover the bowl with plastic wrap or a damp kitchen towel. Now, go live your life. Let it sit on your counter for anywhere from 12 to 18 hours. You’ll see it bubble and rise. It’s alive!
3. **The Gentle Fold:** Lightly flour your countertop. Scrape the dough out. It will be stringy and wet. Gently fold it over on itself once or twice. Don’t knead it. Just shape it into a rough ball.
4. **The Second Rise:** Place the dough on a piece of parchment paper. Let it rest for another 30 minutes while your oven and Dutch oven preheat to 450°F (230°C). This is the perfect time to tidy up.
5. **The Main Event:** Carefully place your hot Dutch oven into the oven to preheat it as well. After 30 minutes, lift the parchment paper with the dough on it and lower it straight into the hot pot. Put the lid on.
6. **Bake Covered:** Bake for 30 minutes. This is the steam phase, creating that perfect crust.
7. **Bake Uncovered:** Take the lid off. The loaf should be pale gold. Keep baking for another 15-20 minutes until it’s a deep, glorious golden brown.
8. **The Hardest Part:** Remove the bread and let it cool on a wire rack for at least one hour before slicing. I know, it’s torture. But slicing into hot bread creates a gummy texture. Patience is a virtue.

Don’t Be That Baker: Common Pitfalls to Avoid
Even the easiest recipes have a few sneaky ways to trip you up. Here’s how to stay on the winning side.
🍳 Used in this recipe
Get It on Amazon Basics✔ Free Delivery | ✔ Top Rated | ✔ Budget-Friendly* **The Temperature Tantrum:** Your environment matters. If your kitchen is frigid, your dough will need more time to rise. If it’s a sauna, it might be ready sooner. Learn to read the dough, not the clock. Look for it to be bubbly and about double in size.
* **The Over-Flour Fiasco:** When you go to shape your dough, it will be sticky. Your first instinct is to dump a pile of flour on it. Resist! Use wet hands or lightly floured hands, but don’t turn it into a dry brick. A little stickiness is key to an open crumb.
* **The Impatient Slice:** I’m saying it again because it’s the #1 mistake. You have waited 18+ hours. You can wait one more. Slicing into that steamy interior before it sets is a tragic, gummy ending to a beautiful story.
Serving Vibes: Setting the Scene
This bread is a chameleon. It’s the star of a rainy Sunday dinner, sitting next to a steaming bowl of creamy tomato soup, just begging to be dunked. The crackle of the crust against the quiet patter of rain is a symphony.
Or, picture this: you’re having friends over. You pull this golden beauty out of the oven, set it on a wooden board in the middle of the table with a dish of good olive oil and a bowl of flaky salt. Conversation stops. This bread builds community. It’s rustic, it’s honest, and it turns a simple meal into a feast. It’s the foundation of a killer charcuterie board (minus the pork, of course!), perfect for scooping up dips and cheeses.
🍳 Used in this recipe
Get It on Amazon Basics✔ Free Delivery | ✔ Top Rated | ✔ Budget-FriendlyFrom the Crumb Basket: Your Bread FAQs
You’ve got questions. I’ve got answers. Let’s dive into the nitty-gritty of your new favorite loaf.
Recommended Product

Amazon Basics Silicone Baking Mat (2-Pack Non-Stick Oven Liners)
- Material →: Food-safe silicone, reusable thousands of times
- Non-Stick →: No butter, oil, or parchment needed
How to freeze Easy No-Knead Artisan Dutch Oven Bread?
This is a fantastic question because you’ll want to make two loaves at a time. Once the bread is **completely cool** (I cannot stress this enough), wrap it tightly in plastic wrap, followed by a layer of aluminum foil, and then pop it into a freezer-safe bag. It will keep for up to 3 months. To thaw, let it sit on the counter for a few hours. To bring back that fresh-baked magic, remove the wrapping, and reheat it in a 350°F (175°C) oven for 10-15 minutes. It will taste like you just made it.
Calories in Easy No-Knead Artisan Dutch Oven Bread?
A standard loaf made with 3 cups of all-purpose flour will yield about 12 slices. A single slice is roughly 150-180 calories, depending on how thick you slice it. It’s hearty, wholesome fuel, not empty calories. You’re eating pure, simple ingredients. There’s nothing to feel guilty about here, especially when you slather it with butter.
🍳 Used in this recipe
Get It on Amazon Basics✔ Free Delivery | ✔ Top Rated | ✔ Budget-FriendlyCan I really make this in a Dutch oven? What if I don’t have one?
Yes, the Dutch oven is non-negotiable for the classic result. It’s what creates the steamy oven environment. If you don’t have one, you can simulate it. Place a heavy, oven-safe pot or even a baking stone in the oven to preheat. You can bake your bread on a baking sheet. For the steam, place a metal pan on the bottom rack of the oven while it preheats. When you slide your bread in, carefully pour a cup of hot water into the hot pan on the bottom rack and quickly shut the oven door. Be careful—the steam will be intense! The crust won’t be *quite* as perfect as a true Dutch oven loaf, but it will still be fantastic.
My dough looks like soup! Did I mess up?
Not at all! The dough for this bread is notoriously wet and sticky. This is by design. A wetter dough allows for a more open, airy crumb. Don’t be tempted to add a ton of extra flour when you’re mixing. It should look like a gloopy, shaggy mess. Trust the process. When it’s time to shape it after its long rise, it will have firmed up a bit, but it will still be sticky. That’s the secret to artisan-style bread.
Recommended Product
 -11%
-11%
8‑Piece Deep Glass Baking Dish Set with Plastic Lids (Rectangular Bakeware)
- Material: Oven, freezer & microwave safe borosilicate glass (goes from fridge/oven without cracking)
- Pieces →: 4 rectangular dishes + 4 tight‑fitting plastic lids (stackable)
- Easy Care →: Dishwasher safe glass & lids
What’s the best way to store leftover bread?
Whatever you do, **do not put it in the refrigerator**. The cold, dry environment of a fridge will turn your beautiful crust stale and the interior tough. The best way to store it is cut-side down on a wooden cutting board, loosely covered with a clean kitchen towel, for up to two days. For longer storage, see the freezing question above. If it does get a bit stale, it makes the absolute best croutons or breadcrumbs for your next culinary adventure.
Easy No-Knead Artisan Dutch Oven Bread
Ingredients
Ingredients
- 3 cups all-purpose flour plus extra for dusting
- 1.5 tsp kosher salt fine grain
- 0.5 tsp instant yeast or active dry yeast
- 1.5 cups warm water 110°F to 115°F
Notes
🍳 Used in this recipe
Get It on Amazon Basics✔ Free Delivery | ✔ Top Rated | ✔ Budget-Friendly