The Siren Song of a Perfect Crust
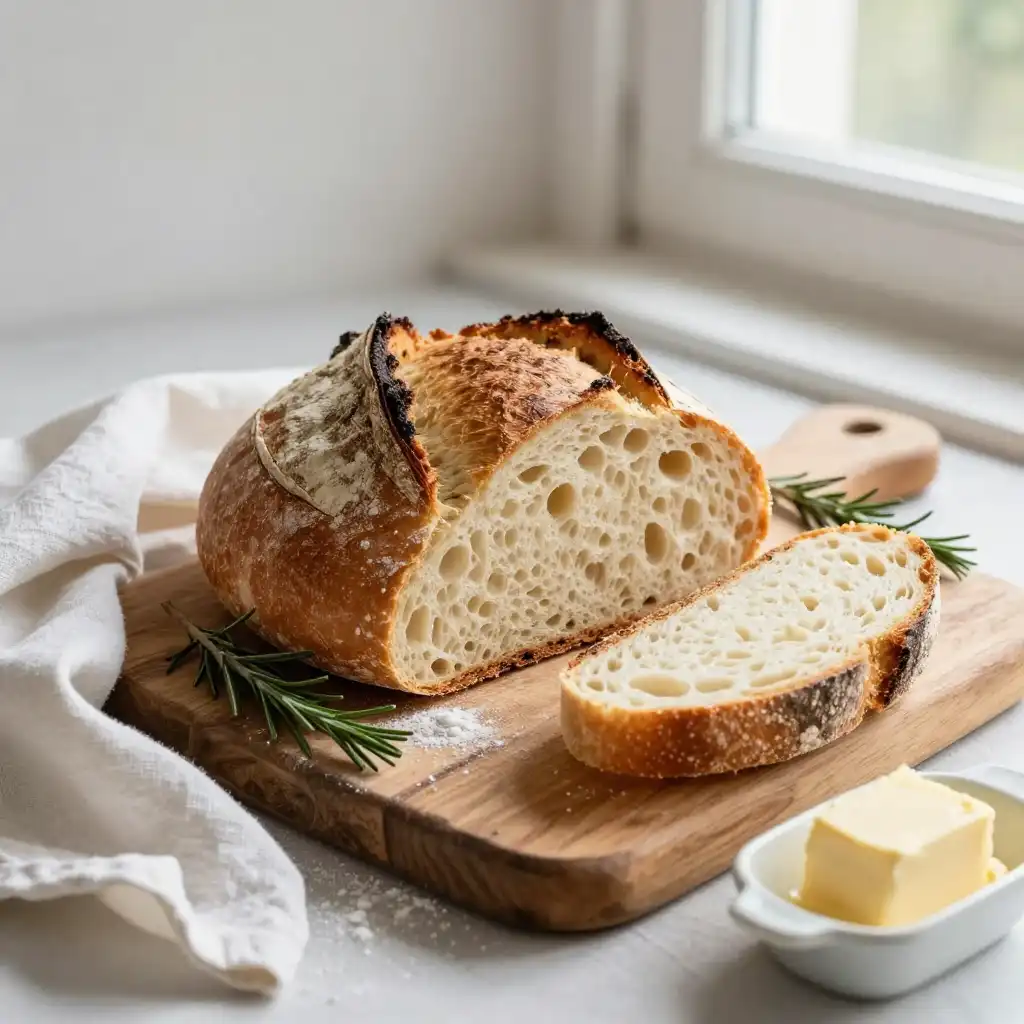
It starts with a sound. Not a bang, but a whisper—a soft, crackling symphony that happens the moment you pull this masterpiece from the oven. The aroma hits you first: a warm, yeasty, slightly sweet cloud that makes your kitchen feel like a tiny, artisan bakery. It’s the kind of smell that stops a busy household in its tracks, pulling everyone toward the source with a gravitational pull that’s impossible to resist. This isn’t just bread; it’s an event.
You see, for years, I thought artisan bread was reserved for those with doughy hands and a mysterious, flour-dusted aura. I believed it required fancy mixers, obsessive kneading, and a level of patience I simply didn’t possess. Then I discovered the secret: the Dutch oven and the magic of doing almost nothing. This **Easy No-Knead Artisan Dutch Oven Bread** is my love letter to lazy baking, a recipe that gives you a professional-style loaf with a shatteringly crisp crust and a soft, airy interior, all with about five minutes of active work. It’s a game-changer.
Recommended Product

The Alchemist’s Toolkit: What You Need to Raid the Pantry
We’re not building a rocket ship here. The beauty of this **Easy No-Knead Artisan Dutch Oven Bread** lies in its glorious simplicity. You need four things, maybe five if you’re feeling fancy. First, the foundation: all-purpose flour. This is your canvas. Then, the rising power: a pinch of instant yeast. This little organism is what will create those beautiful, open bubbles in your crumb. We also need fine sea salt for flavor enhancement—it’s not just for taste, it helps control the yeast’s wild energy. And finally, water. Not just any water, but lukewarm water that feels like a gentle hug to your wrist. That’s it. The magic comes from the combination and the time you let them work together.
🍳 Used in this recipe
Get It on Amazon Basics✔ Free Delivery | ✔ Top Rated | ✔ Budget-FriendlyNow, about that Dutch oven. This is your secret weapon. A heavy, lidded pot (cast iron is glorious, but any oven-safe pot with a lid will do) creates a perfect, steamy environment. The steam keeps the crust soft at the beginning of baking, allowing the bread to expand to its full, glorious potential (this is called “oven spring”). Then, when you remove the lid, that dry heat gives you the deep, golden-brown, crackly crust of your dreams. It’s a simple piece of cookware that delivers professional results. You can find more inspiration for your baking journey on this external link about how to make this bread at home.
The Long, Slow Dance: The Science of Lazy Baking
This is where the **Easy No-Knead Artisan Dutch Oven Bread** truly earns its stripes. We’re trading brute-force kneading for the gentle, powerful work of time. Instead of manually developing gluten strands, we let the yeast do the heavy lifting over a long, slow fermentation—anywhere from 8 to 18 hours. During this time, the yeast slowly eats the sugars in the flour, producing carbon dioxide bubbles that get trapped in the developing gluten network. This long, cool rise is the secret to developing a deep, complex, slightly tangy flavor that you simply can’t get from a quick-rise recipe.
The lack of kneading also prevents the gluten from becoming too tight. This results in a more extensible dough, one that’s relaxed and happy. When it hits the screaming-hot Dutch oven, the trapped gases expand rapidly, and the relaxed gluten allows for that incredible “oven spring,” creating an open, airy crumb with irregular holes—the hallmark of a true artisan loaf. It’s a beautiful lesson in patience and trust: let the ingredients do the work, and you’ll be rewarded tenfold.
🍳 Used in this recipe
Get It on Amazon Basics✔ Free Delivery | ✔ Top Rated | ✔ Budget-FriendlyHow to Make Easy No-Knead Artisan Dutch Oven Bread: A Foolproof Guide
Alright, let’s get our hands (lightly) dirty. This is the part where you become a bread wizard with minimal effort. Grab a large bowl.
Step 1: The Simple Mix
In your bowl, whisk together 3 cups of all-purpose flour, 1 ½ teaspoons of fine sea salt, and ½ teaspoon of instant yeast. Make a well in the center and pour in 1 ½ cups of lukewarm water. Using a spatula or your hands, mix until a shaggy, sticky dough forms. There should be no dry flour patches. Don’t panic if it looks messy; that’s exactly what we want.
Step 2: The Magic of Time
Cover the bowl with plastic wrap or a damp kitchen towel. Now, walk away. Let it sit on your counter at room temperature for 8 to 18 hours. The longer it sits, the more flavor it develops. You’ll know it’s ready when the surface is dotted with bubbles and it has a slightly fermented, tangy smell. This is the heart of the **how to make Easy No-Knead Artisan Dutch Oven Bread** process.
🍳 Used in this recipe
Get It on Amazon Basics✔ Free Delivery | ✔ Top Rated | ✔ Budget-FriendlyStep 3: The Shape and Second Rise
Lightly flour a clean surface and scrape the dough out. It will be sticky and stringy. Fold it over onto itself once or twice to form a rough ball. Place it on a piece of parchment paper (for easy transfer) and let it rest, covered, for 30 minutes to 1 hour. Meanwhile, place your Dutch oven with its lid inside your regular oven and preheat to 450°F (230°C). The pot needs to be screaming hot.
Step 4: The Bake
Carefully remove the hot Dutch oven from the oven. Lift the parchment paper with the dough and lower it straight into the pot. Cover with the lid and bake for 30 minutes. This is the steamy part that creates the magic. After 30 minutes, remove the lid. The bread will be pale but puffed up. Continue baking, uncovered, for another 15-20 minutes, until the crust is a deep, irresistible golden brown. The internal temperature should read about 205°F (96°C).
Step 5: The Hardest Part: Waiting
Using the parchment paper as handles, lift the bread out of the pot and place it on a wire rack. You must let it cool for at least one hour before slicing. If you cut into it while hot, the steam escapes and the interior can become gummy. Trust me, the wait is worth it.
🍳 Used in this recipe
Get It on Amazon Basics✔ Free Delivery | ✔ Top Rated | ✔ Budget-Friendly
Common Pitfalls: How NOT to Mess Up Your Masterpiece
Even the simplest recipes have their quirks. Let’s sidestep the common blunders so your first loaf is a triumph.
The “I Forgot About It” Dilemma
Can you let the dough rise for more than 18 hours? Absolutely. If life gets in the way and your dough sits for a full day (or even a day and a half), it’s not ruined. It will be more tangy, almost sourdough-like. If it looks like a bubbly, domineering monster, just give it a quick fold and proceed. The flavor will be intense and wonderful.
The “Sticky Situation” Fear
This dough is supposed to be sticky. Resist the urge to add more flour during the initial mix. A wetter dough is key to a more open crumb. When you go to shape it after the long rise, use wet hands or a spatula instead of adding tons of flour. You want to handle it as little as possible.
🍳 Used in this recipe
Get It on Amazon Basics✔ Free Delivery | ✔ Top Rated | ✔ Budget-FriendlyThe “Cold Pot” Catastrophe
The single most important step for a great crust is a preheated Dutch oven. Placing your dough into a cold pot will result in a dense, sad loaf. That initial blast of heat from all sides is what kickstarts the oven spring. Don’t skip the preheat! For more visual guides, check out this Pinterest search for making artisan bread at home.
Recommended Product
 -11%
-11%
8‑Piece Deep Glass Baking Dish Set with Plastic Lids (Rectangular Bakeware)
- Material: Oven, freezer & microwave safe borosilicate glass (goes from fridge/oven without cracking)
- Pieces →: 4 rectangular dishes + 4 tight‑fitting plastic lids (stackable)
- Easy Care →: Dishwasher safe glass & lids
Serving Vibes: Setting the Scene for Your Bread
This bread is a chameleon. It’s the star of a cozy, rainy Sunday. Picture this: a thick slice, still warm from the oven, slathered with creamy butter that melts into every crevice. The steam rises to meet your face as you take the first bite—the crunch of the crust giving way to the soft, chewy interior. It’s simple, perfect, and deeply satisfying.
But it’s also the backbone of a fantastic sandwich. It has the structural integrity to hold a mountain of fillings without falling apart. Toast it for a crunchy crouton in a rustic salad. Cube it for a hearty soup topper. It’s the perfect companion to a bowl of tomato soup, a platter of roasted vegetables, or just a quiet moment with a cup of tea. This **Easy No-Knead Artisan Dutch Oven Bread** makes any meal feel special.
🍳 Used in this recipe
Get It on Amazon Basics✔ Free Delivery | ✔ Top Rated | ✔ Budget-FriendlyLeftovers? Here’s the Plan
If you somehow have leftover bread (a rare occurrence), here’s how to keep the magic alive. Do not store it in a plastic bag on the counter, as the crust will soften. Instead, let it cool completely, then wrap it in a clean cotton cloth or paper bag and store it cut-side down on the counter. It will stay good for 2-3 days.
To revive it, simply pop a slice in a toaster or a hot oven for a few minutes to bring back the crunch. For longer storage, this bread freezes beautifully. Slice it first, then freeze the slices in a single layer on a baking sheet before transferring to a freezer bag. This way, you can grab a slice whenever the craving hits and toast it directly from frozen. To answer the common query, **how to freeze Easy No-Knead Artisan Dutch Oven Bread** is all about slicing first and avoiding moisture.
Your Questions, Answered (The FAQ)
Let’s tackle the big questions that might be swirling in your head.
🍳 Used in this recipe
Get It on Amazon Basics✔ Free Delivery | ✔ Top Rated | ✔ Budget-FriendlyWhat is the calorie count for this bread?
People often ask about the **calories in Easy No-Knead Artisan Dutch Oven Bread**. A thick slice of this homemade loaf (roughly 1/8th of the total) is estimated to be around 150-180 calories. This is significantly lower than many store-bought artisan loaves, which can be packed with unnecessary fats and sugars. You know exactly what’s going into it!
Can I use whole wheat flour?
You can, but with caution. Whole wheat flour absorbs more water and can make the dough denser. For your first try, stick to all-purpose for the guaranteed open crumb. If you want to experiment, try replacing 1 cup of the all-purpose flour with whole wheat and add an extra 2-3 tablespoons of water.
My dough didn’t rise much. What went wrong?
The most likely culprit is old yeast. Always check your yeast’s expiration date. Another factor could be the water temperature. If it was too hot, it could have killed the yeast; too cold, and it just won’t wake up. Lukewarm is key—think bathwater temperature.
🍳 Used in this recipe
Get It on Amazon Basics✔ Free Delivery | ✔ Top Rated | ✔ Budget-FriendlyDo I need a Dutch oven, or can I use something else?
While a Dutch oven is ideal for creating steam, you can simulate it. Place a heavy, oven-safe pot or even a baking stone in the oven to preheat. Put your dough on a parchment-lined baking sheet, slide it into the oven, and immediately toss a few ice cubes into a hot pan placed on the bottom rack to create steam. It’s a bit more fussy, but it works in a pinch.
Recommended Product

Amazon Basics Silicone Baking Mat (2-Pack Non-Stick Oven Liners)
- Material →: Food-safe silicone, reusable thousands of times
- Non-Stick →: No butter, oil, or parchment needed
How long does the finished bread stay fresh?
As mentioned in the leftovers section, it’s best eaten within 2-3 days. The crust is at its peak for the first day. After that, it’s perfect for toasting or turning into breadcrumbs or croutons. Don’t let a single crumb go to waste

Easy No-Knead Artisan Dutch Oven Bread
Ingredients
Ingredients
- 3 cups all-purpose flour plus more for dusting
- 1.5 tsp salt fine sea salt
- 0.5 tsp instant yeast or active dry yeast
- 1.5 cups warm water about 105°F (40°C)